Our laundry was kept in a collection of plastic bins and cloth bags in a cabinet in the laundry room. As I "heard" that the cloth bags were on their way out and were most likely being replaced by more plastic bins, I diplomatically cut in and ask for a few weeks so that I could design and build some laundry boxes from wood. As the laundry boxes had to share the cabinet space with ironing board, vacuum cleaner hose, brooms, etc., they could only occupy a space of 42" wide by 18" deep. The power head of the vacuum cleaner had to fit under the laundry box, hence a clearance of 3 1/2" was needed. Although the height was less critical, a practical limit was 30" as we have work coates hanging above it while we should be able to reach to the bottom. Finally, the boss insisted on four boxes or compartments to sort the laundry into dark, coloured, white and towels. If you know what is good for you then you don't argue with her!
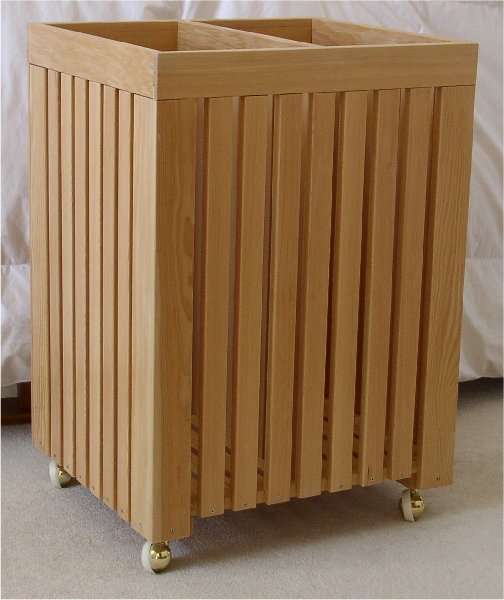
I came up with two laundry boxes of 21" by 18", each with two compartments placed on casters so that they can be rolled in and out of the cabinet. To ensure that any damp laundry would not get moldy I decided on an airy construction with fir slats. Certainly not a cheap solution, but it is amazing how fantastic it looks.
Pictures
Click on a picture to get a larger picture and then used the back button of the browser to return.
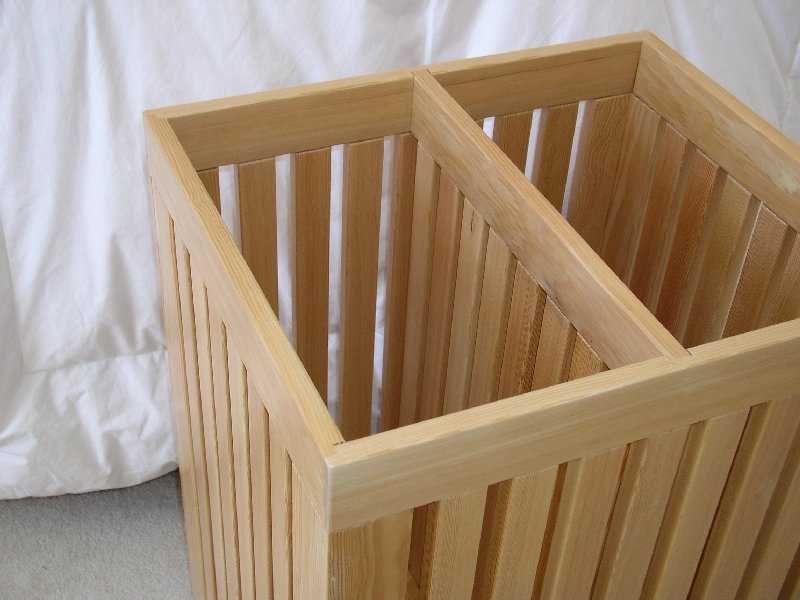
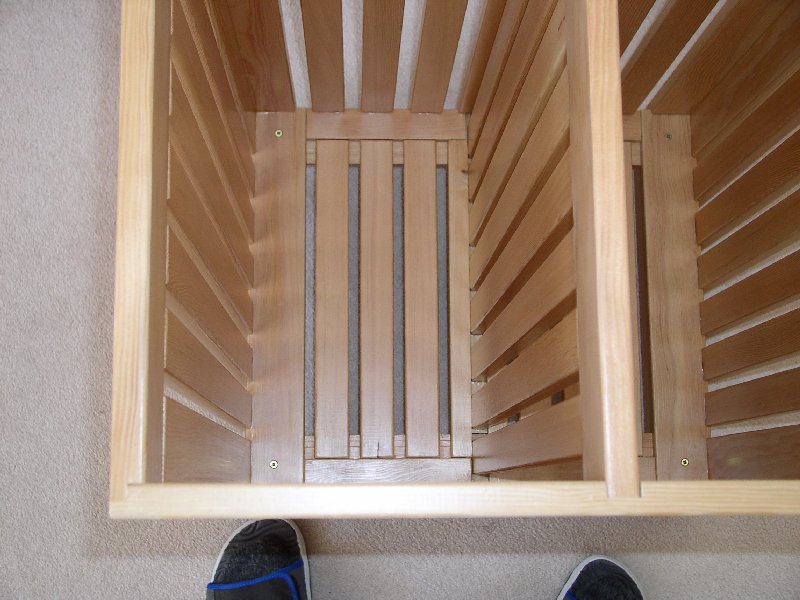
Full viewTop viewA look inside
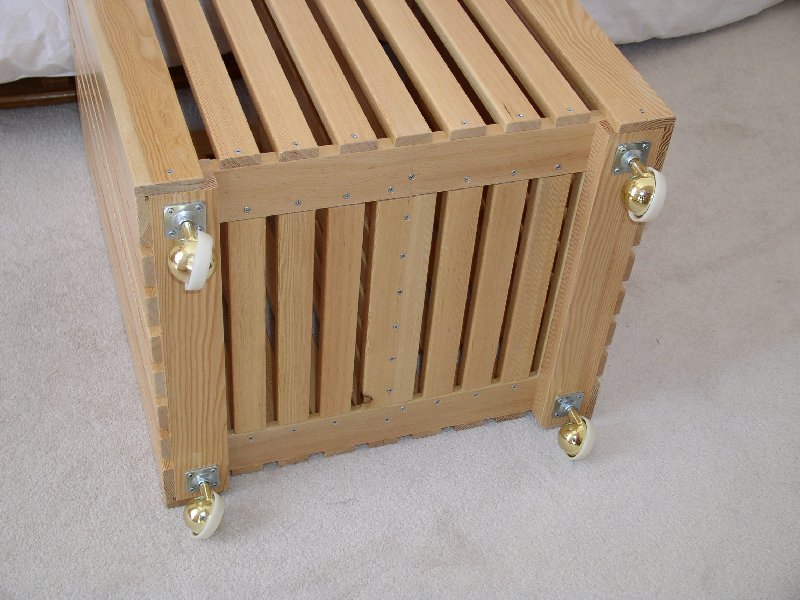
Bottom view
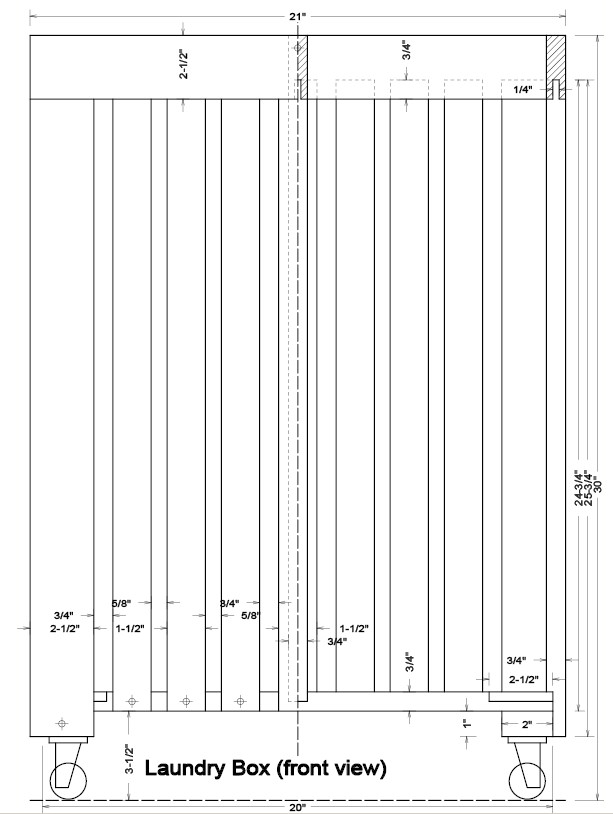
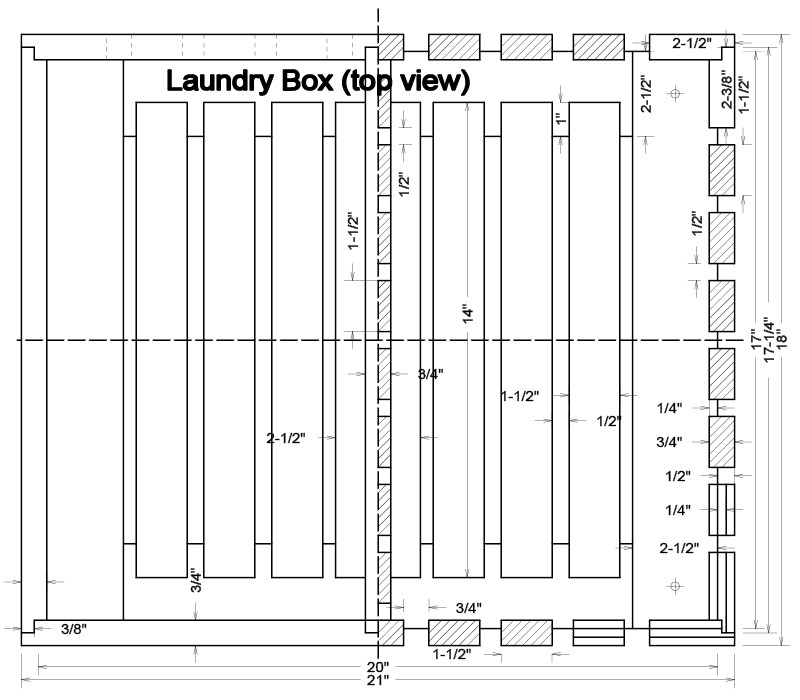
Plans, Drawings, Sketches (inches) (11-Feb-2006)
To view or print the full scale drawing just click on a drawing, and then use the print-preview of the browser to select portrait/landscape format and (re)size the drawing before doing the actual printing.
Materials List (inches)
no.
description
length
width
thickness
suggested basic material, comments
2
base, front/back
20
2 1/2
3/4
3 x 12ft of 1"x3" S4S fir
2
base, sides
17
2 1/2
3/4
see above
1
base, centre
14
2 1/2
3/4
see above
2
top rail, front/back
21
2 1/2
3/4
see above
3
top rail, sides/centre
11 3/4
2 1/2
3/4
see above
4
corner pieces, back/front
25 3/4
2 1/2
3/4
see above
4
corner pieces, sides
25 3/4
2 3/8
3/4
see above, see construction note
12
slats, sides
25 3/4
1 1/2
3/4
6 x 13ft and 1 x 5ft of 1"x2" S4S fir
14
slats, front/back
24 3/4
1 1/2
3/4
see above
8
slats, centre
24 3/8
1 1/2
3/4
see above
6
slats, base
14
1 1/2
3/4
see above
2
block under base to raiser casters
17
2 1/2
1
1 x 3ft of 2"x4" fir
4
metal ball casters
2 1/2" high
LePage carpenter's glue
yellow, cabinet maker's quality
40
screws, robson, flat head
1 1/4
#6
for base, corners, top centre and side slats
24
screws, robson, flat head
3/4
#6
for centre slats and casters
14
screws, robson, flat head
5/8
#6
for base slats
32
finishing nails
1
acrylic urethane varnish
gives fir a slightly yellowish finish
The sanded four sides (S4S) fir has rounded off edges. The reason for buying longer stock is that you have less waste.
Required Tools
Power tools -- table saw, miter saw, planer, random orbit sander, dado set.
All measurements are in inches (1 inches = 2.54 cm) because all wood measurements in the shop are in inches. I recommend to cut, shape and sand all pieces and dry fit them together with clamps.
Cut and shape the stock
Cut to length. The 1 x 3 S4S fir has an actual size of 3/4 x 2 1/2, while 1 x 2 stock has an actual size of 3/4 x 1 1/2. Therefore all that needs to be done is cut the material to the right lengths using the miter saw. Start with cutting the longest pieces using a stop block so that pieces of the same length have indeed the same length.
Run four corner pieces through the table saw at a width of 2 3/8" to get rid of the rounded off edge on one side. I had to buy 2 x 4 stock for the blocks under the base to raised the casters for that 3 1/2" clearance. I used the table saw, planer and miter saw to mill the two 1 x 2 1/2" blocks.
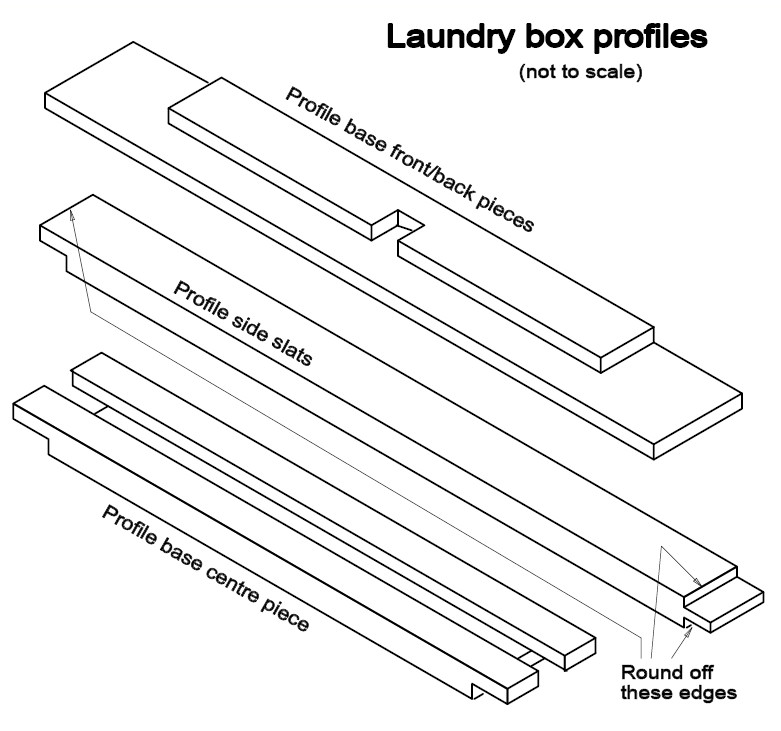
Dado height at 1/4". Set tongue length at 3/4". Mill the top end of the side, front, back and centre slats on both sides so that a 1/4" thick tongue is formed (see profile drawing). Next do the same with the corner pieces. Mill the bottom end of the front and back slats on one side. Set the tongue length to 1 3/4" and mill the bottom end of the side slats on one side.
Here comes the most critical part of the whole project. Study the corners very carefully. Eventually the flat side of the 2 3/8" piece fits against the 2 1/2" piece. Secondly the front corners are mirror images of the back corners. So pair the pieces for each corner and mark where the length wise rabbet is coming and were that bit at the bottom has to be milled away. With the dado still at 1/4" height and the tongue length at 1 3/4" mill the bottom end of the corner pieces on one side.
Dado height at 3/8". Set tongue length at 3/8". Mill each end of the side, front and back top pieces on one side. Set the tongue length to 1". Mill each end of the base slats and the base centre piece on one side (see profile drawing). Adjust the tongue length to 2 1/2" and mill each end of the side, front and back pieces of the base on one side.
Mark on the top front and back pieces exactly where the 3/4" groove in the middle has to come. Using the same technic mill the groove in those top pieces. Remove the block of wood from the fence. Mark exactly where the centre slot has to come in the base centre piece. With the same dado settings adjust the fence and mill the base centre piece (see profile drawing). Set rabbet depth to 1", i.e. from right side of fence to right side of dado, and mill the front and back pieces of the base (see profile drawing).
Without adjusting the height of the dado reduce its width to 1/4". Now mill the 3/8" rabbet on the edge of the corner pieces.
Dado height at 13/16", i.e. a touch over 3/4" and mill a groove in the middle of the bottom of all top pieces. These grooves will receive the 1/4" tongues of the slats. To finished it off use a chisel to create a 3/4" by 3/4" gap in the front and back pieces of the base (see profile drawing).
Sand all pieces. Round off the edges of the slats as indicated on the profile drawing. Do the same with the corner pieces.
Final assembly
After you have checked the fit of all pieces it is now time to do the assembly. Pre-drill and countersink all screw holes. Don't use too much glue. If glue is squeezed out clean it up with a warm wet cloth. Take the side, front and back pieces of the base, glue the half-lap joints, put the four pieces together, clamp each corner and checked for squareness. Measure the outside distance of the diagonal opposite corners; your piece is square when these two measurements are the same. Set aside to dry.
Put a bead of glue in the 3/8" rabbet of a front and back corner piece, put the matching side corner piece against it and secure with 3 finishing nails on each side, making sure the corner is square. Use a pin punch to set the finishing nails. Put aside to dry. The easiest way is to drive in the finishing nails a bit before gluing the pieces together so that you have "enough" hands to accomplish all this. The corner may need some additional sanding, but this will be done later.
After about an hour the glue of the base should be set enough. Next glue the blocks under the sides of the base, clamp together making sure the outside edges are square with the top, and secure everything with a 1 1/4" screw from the top in each corner at 1 1/4" from the edge. Set aside to let the glue dry.
Put the base flat and glue the centre piece in place. Dry fit the base slats and distribute them evenly. Carefully mark where each slat should come and then glue them in place. Once the glue is dry the centre piece and base slats can be secured from the bottom with 5/8" screws. Put the base right side up and dry fit the corner pieces against it with clamps. Next dry fit the top pieces over the corners. If everything is ok then we are ready for the real assembly. Apply glue to the inside of the corners and put against the base, clamp. Dry fit the top pieces and clamp or use a strap. Measure the top for squareness and let dry for at least an hour. After that secure the corners with a 1 1/4" screw in the middle of each side into the base block. Apply glue to the tongues of the corner pieces, put a bead of glue in the 3/8" rabbet of the front and back top pieces and put them together with the side pieces over the corner pieces, clamp or use a strap. Make sure that the top is flush in the corners and the top is square. Secure the corners of the top pieces with a 1" finishing nail on each side. Set aside to dry. Once dry sand the corners of the laundry box to remove any unevenness.
Put the laundry box on its side. Dry fit the top centre piece. Notice that a little bit of the centre piece extends into the groove of the front and back pieces. Mark that and carefully trim the centre piece. Now dry fit the centre slats and the top centre piece, pushing the centre slats with the top piece against the base centre pieces. Distribute the slats evenly, marking where each slat should come and secure them from the bottom with 3/4" screws. Put the laundry box straight and remove the top centre piece. Apply glue into the groove and on the ends, put the top piece back in position ensuring that the top is flush with the rest of the top and that the slats are at their marked position. Secure the top piece with a 1 1/4" screw through the front and back piece.
Put the laundry box on its side. Dry fit the slats for the side that is on top. Distribute the slats evenly, marking where each slat should come. Working one slat at a time, apply glue to the tongue, put it in place as per the marking and secure at the bottom with a 1 1/4" screw. Repeat for each side. Put the laundry box upside down. Position the centre of the casters about 1 1/4" from the edges of the base block and secure with four 3/4" screws.
Fill the holes of the finishing nails with a wood filler and sand flush. Make everything dust free and apply two coats of clear acrylic urethane varnish.