This outdoor bench is multi-purpose. It serves as a coffee table for our park bench overlooking our vegetable yard, but it is very sturdy and can be used as an extra bench to seat two people. Made of red cedar it should last a very long time.
The intension was to make it from 1" by 2" (finished size) red cedar slats, but those I could get only in the knotty version. The available clear red cedar was 2" by 6" (1½" by 5½" finished size). That ment back to the drawing board and this is the result. Making this bench from pine would make it much cheaper, but we prefer red cedar for outdoor projects.
Pictures
Click on a picture to get a larger picture and then used the back button of the browser to return.
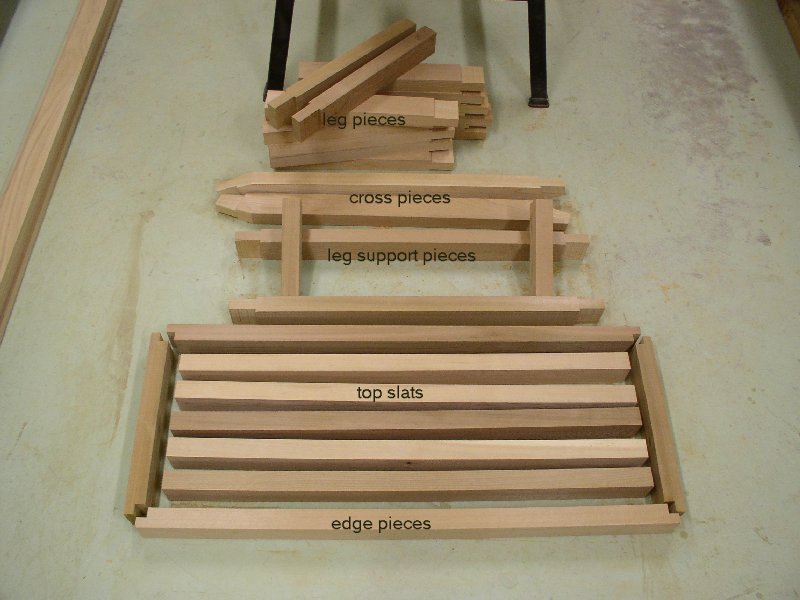
The raw 5 feet cedar boardsPieces cut to lengthDry-fitting the pieces togetherStart assemblingLeg mounted against front edgeFitting leg and top slat
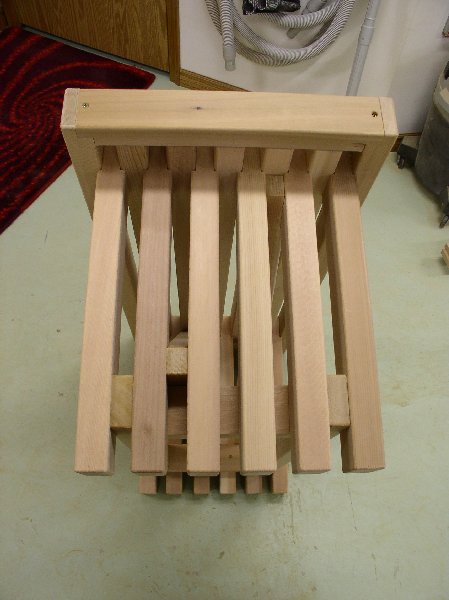
Detail of topLook from the backDetail of sideCompleted bench
How others did it
John Byrnes used my drawing and this is what he had to say: "Thanks for letting me tap into the bench plan. Made for a nice Christmas gift for my sister.
I modified it a little to eliminate the cross brace by cutting the legs with gussets at the top for stability. Here's the end result. Thanks again."
John is obviously not a novice woodworker, and his idea of using gussets is indeed very neat.
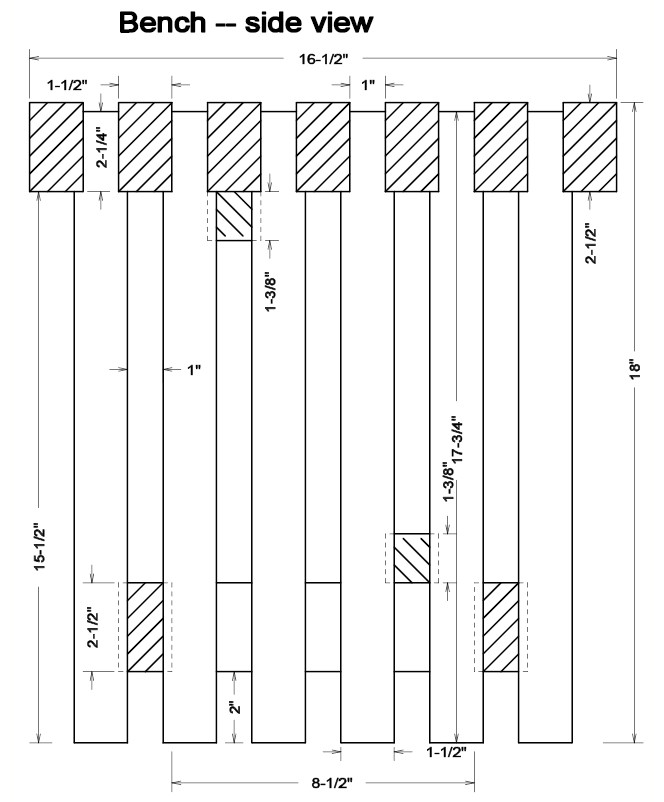
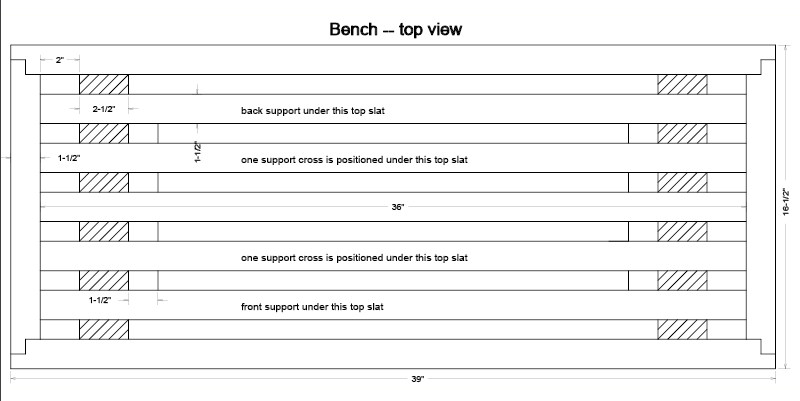
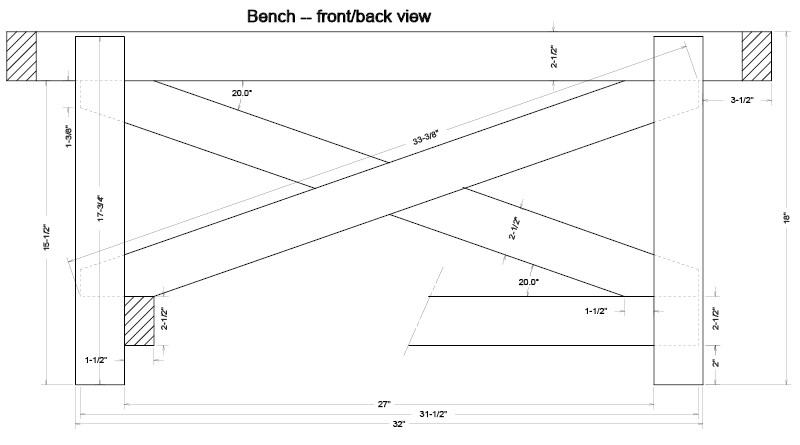
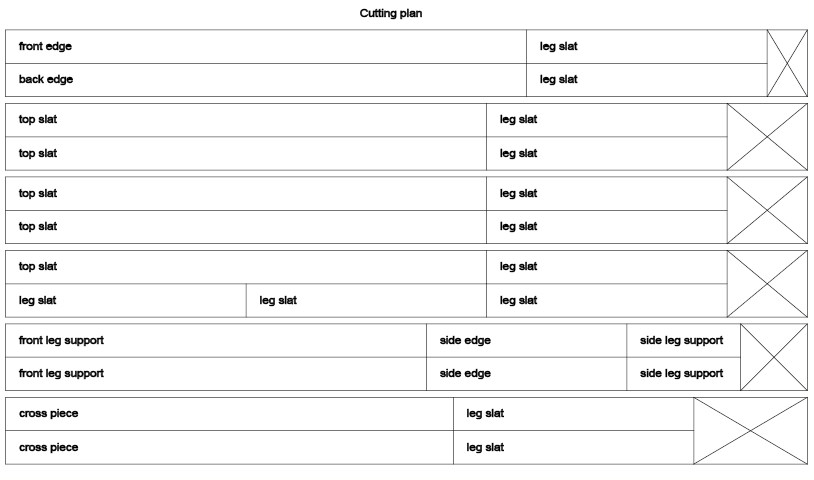
Plans, Drawings, Sketches (inches) (11-Feb-2006)
Bench -- side view
Bench -- front/back view
Bench -- side view
Bench -- cutting plan
To view or print the full scale drawing just click on a drawing, and then use the print-preview of the browser to select portrait/landscape format and (re)size the drawing before doing the actual printing.
Materials List (inches)
Required are 6 lengths of 5 feet of 2" by 6" red cedar which are sanded on four sides (S4S) and have a finished size of 1½" by 5½".
qty
description
length
width
thickness
suggested basic material, comments
2
top, front/back edge
39
2 1/2
1 1/2
6 x 5ft of 2"x6" S4S red cedar
2
top, side edge
15
2 1/2
1 1/2
see above
5
top slat
36
2 1/2
1 1/2
see above
12
leg slat
17 3/4
2 1/2
1 1/2
see above
2
front/back leg support
31 1/2
2 1/2
1 1/2
see above
2
side leg support
8 1/2
2 1/2
1 1/2
see above
2
cross piece
33 3/8
2 1/2
1 1/2
see above
LePage carpenter's glue
yellow, cabinet maker's quality
32
screws, robson, flat head
2 1/2
#8
flooring screws are best
20
screws, robson, flat head
2
#8
see above
Flood, CWF-UV, clear
optional
Redwood colour: C 15½, F 9, B 7½
Buying longer stock gives you less waste, but it is often more expensive. So do your homework first.
Required Tools
Power tools -- table saw, miter saw, planer (depending on stock), random orbit sander, router, hand drill, dado set.
All measurements are in inches (1 inches = 2.54 cm) because all wood measurements in the shop are in inches. I recommend to cut, shape and sand all pieces and dry fit them together with clamps.
Cut and shape the stock
Cut to length. Set table saw width to 2 1/2". Select and put the best edge against the fence and rip one strip of 2 1/2". Repeat with the remaining pieces. There should be 12 pieces in all. Keep the 6 leftover pieces of 1/4" for a later project. Next cut all pieces to length according to the cutting plan and the materials list. Its is recommended to cut the cross pieces, side leg supports and side edges about 1/2" longer. We will trim those later.
Dado height at 1/4". Set tenon length at 2 1/4;". Mill the top end of all the leg slats to form a 1" thick tenon side. Do the same with both ends of the front and back leg support pieces. Don't change the dado as we need it later.
Dry fit the bench up-side down as far as possible, i.e. put the top front and back edges and the top slats on a flat surface and put the tenons of all the legs in between and clamp. Next put the front and back leg support between the proper legs and clamp. Measure the required length of the top side edges and side leg supports and cut them to length. With the dry fitted bench mark the ends of the cross pieces. First trim off the top and bottom under a 20 degree angle then trim to the final length. Mark where the tenons should come. Set the gauge off the table saw to 20 degree and cut one side of each tenon. Change the gauge to 20 degrees the otehr way and finish the tenons. Dry fit the cross pieces.
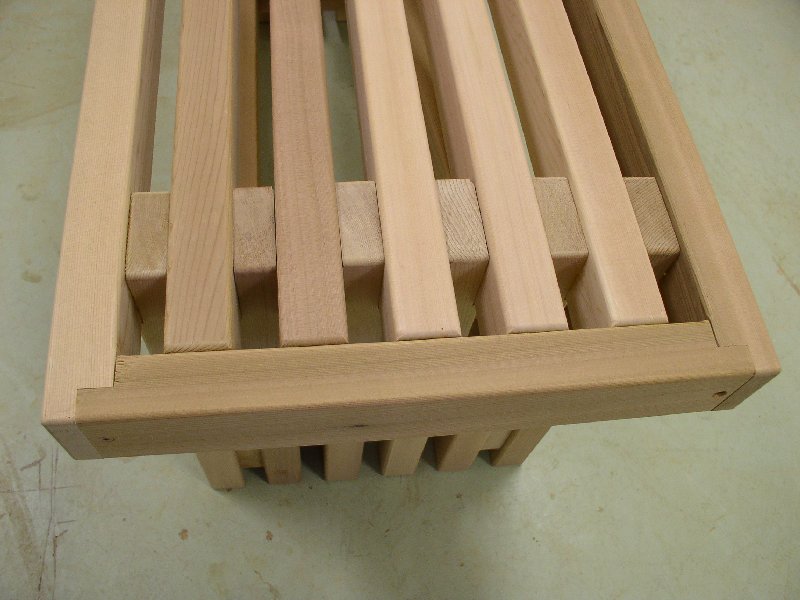
Dado height at 3/4". Set width at 3/4" and cut the rabbets at the ends of all top edge pieces. Dry fit these pieces as well. If everything looks fine then the bench can be disassembled for the next step.
Sand all pieces. Round off the edges that will be exposed with a 3/16" round-over router bit.
Final assembly
Now it is time to do the assembly. Pre-drill and countersink all screw holes. Don't use too much glue. If glue is squeezed out clean it up with a warm wet cloth. The choice of 2" or 2 1/2" screw is based on the thickness of the first piece the screw goes through. If that is a 1" tenon then a 2" screw still goes 1" into the bottom piece. If it is a 1 1/2" slat then a 2 1/2" screw goes 1" into the bottom piece.
The idea is to assemble the bench slat by slat. Apply glue and one screw to each joint. To avoid a conflict with screws ending up on top of each other, develop a system. When I screw a tenon onto a slat the screw is in the top left or right corner of the joint, and when I screw a slat onto a tenon the screw is in the bottom left or right corner of the joint.
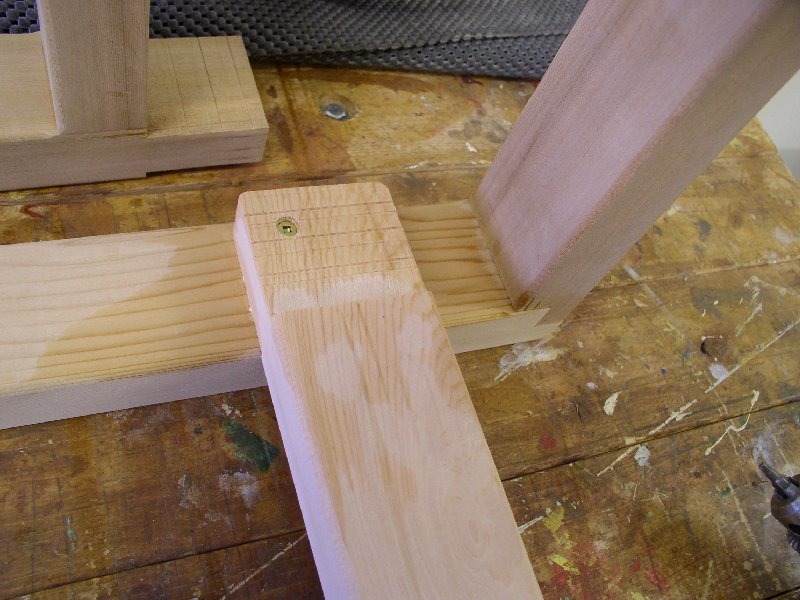
Clamp the front, back and side edges together, but only glue and screw the side edges to the front edge. Clamp the front, back and side leg support pieces together, but only glue and screw the side leg support pieces to the front leg support. Once the glue is dry the rest of the assembly can be done. Put the assembled top edge pieces furthest away from you with the side edges pointing upwards. Temporarily place the back leg support closer toward you. Now position the first set of two legs with the tenons on the front edge using the leg support pieces as spacing between the legs. Clamp and ensure that the legs are perpendicular to the front edge and that the front/back leg support fits snug between the legs. Take you time as the rest is based on this. Finally glue and screw each leg to the front edge.
Next place a top slat between the top edge pieces on top of the leg tenons. You may want to temporarily place and clamp the back edge piece to ensure proper positioning of the slat within the side edge pieces. You may have to do this for the placement of each top slat!!! Then glue and screw the top slat to the leg tenons.
Place the assembled leg support pieces on the legs while temporarily using the cross pieces to ensure proper fit between the top slat(s) and the leg support. Glue and screw the leg support assembly to the legs. Remove the cross piece(s). Position the second set of legs and glue/screw in place, while using the cross piece(s) to verify proper fitting. Next position, glue and screw the second top slat in place. Then position, glue and screw one cross piece in place.
Continue with the third set of legs using a 1" spacer piece where there is no cross piece. Secure these legs with a screw from the side leg supports side. Continue with the third top slat and forth set of legs which are also secured against the side leg supports. Next is the forth top slat and the second cross piece. Top this off with the fifth set of legs. One leg has no support as there is no cross piece to screw into, but don't worry, we will fix that later. Next will be the last top slat followed by the back leg support piece which is glued and screwed to the legs and the side leg supports. Finally the last set of legs.
We are almost there. Glue the top back edge against the side edge pieces and the legs, ensuring that all the top pieces are flush with the top slats, and then secure the back edge piece with screws against the legs and the side edge pieces with a screw into the back edge piece. Finally secure the side edge pieces with a screw against the middle top slat.
You can let the cedar weather naturally or optionally apply two coats of a tinted penetrating oil finish.