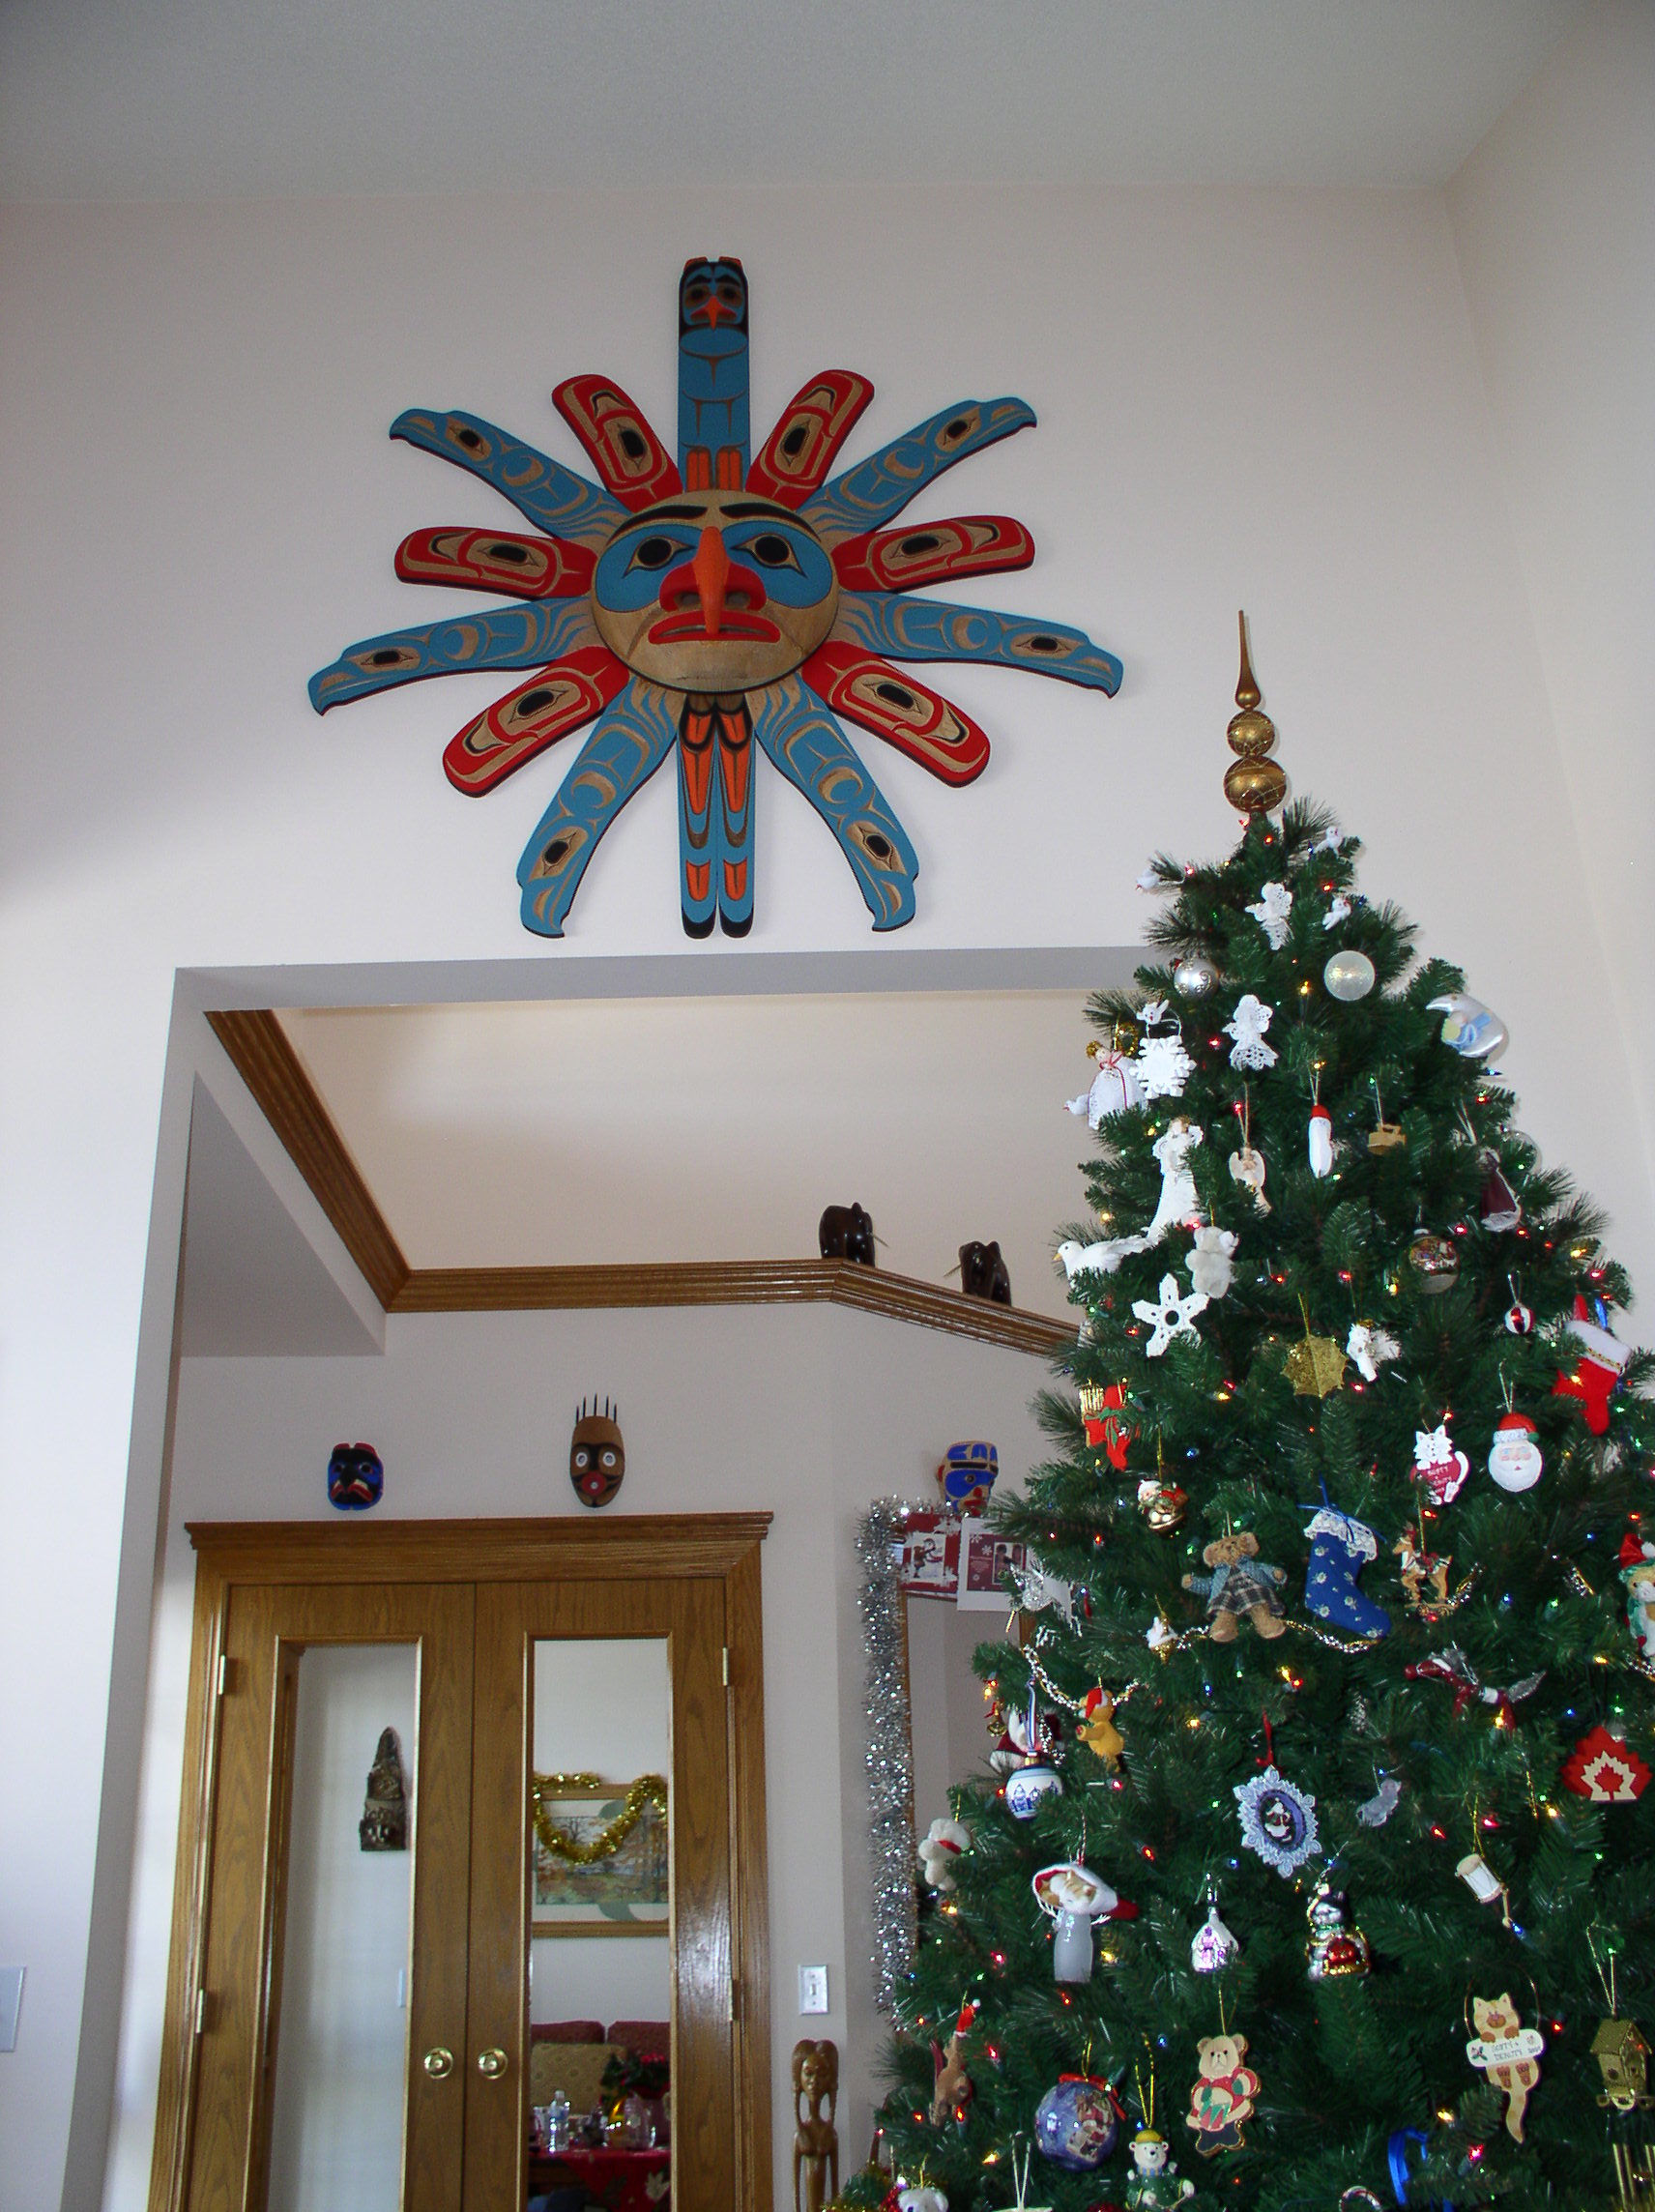
My wife and I were attending a totem pole raising at a carver friend's house. One wall in their diningroom was covered with masks; one of those was a Sun Mask. My wife said that she wanted me to carve a Sun Mask for her. All the walls in our house are already covered with needlepoint work, carvings -- bought and own work --, and pictures. But my wife had already a spot in mind. Our house has a vaulted ceiling which leave a large empty wall space above the passage way between the livingroom and the hall. A large Sun Mask there was not a problem as we have 71" space in height and it would be about 13 feet away from where we would normally be sitting.
This is an "Advanced" project and prior experience in Westcoast Native carving is required.
Design parameters
Together with my Westcoast Native carving instructor, Rick Wolcott, we went through several design versions. In the above mentioned time the design time is not included, only the carving and painting time.
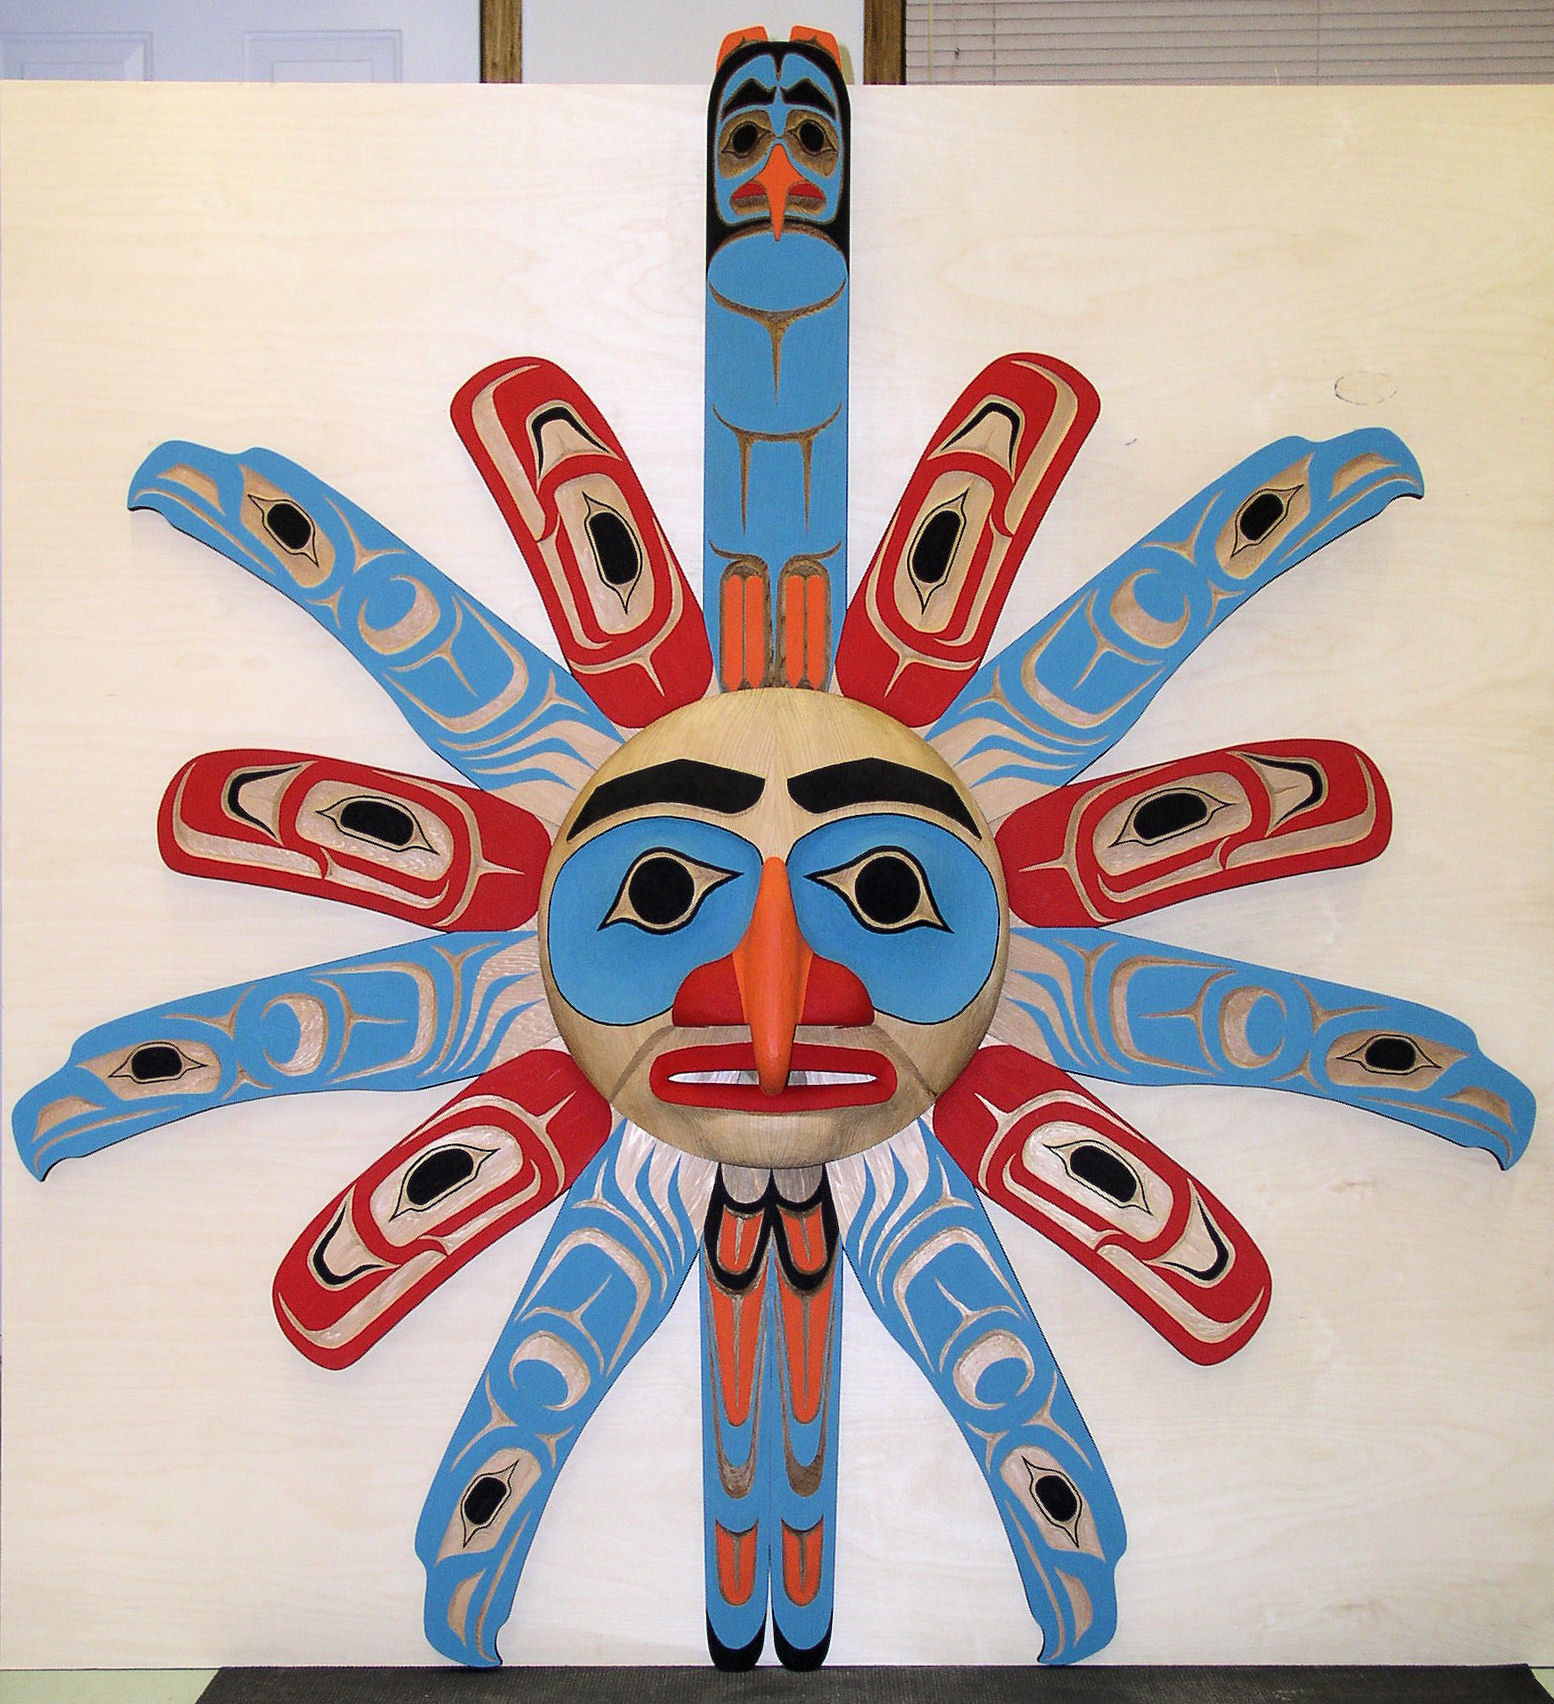
Objective -- To carve and paint a large Sun Mask with lots of carving and very colourful and dramatic finish. It is typically described as a circle with full face, hawk-like beak, protuding rays, no warm smile, but with animated visage. The finished Sun Mask will have a width of 58" (147 cm) and a height of 62" (157 cm).
Face -- Represents obviously the sun itself. It will be 18" in diameter where the centre of the face is about 4" thick, but 6" to 8" where the nose is. Main colour red lips and nostrils, blue around the eyes, brown beak, and black trim.
Seven long rays -- One front facing eagle at the top (25", 34" from centre), six down facing eagles in profile (21", 30" from centre), three on each side. They represent for us power in the sky and flying high. Hence the main colour blue, brown beak, ears and talons, and black trim.
Seven short rays -- At the bottom the tail of the front facing eagle (19", 28" from centre). Six down facing salmon in profile (15", 24" from centre), three on each side. They represent for us food and energy. Hence the main colour is salmon pink, and black trim.
Material & Construction -- For the rays 5½" by ¾" clear red cedar broads. The face including the nose to be constructed from 10" by 4" red cedar timber. The 14 rays are tapered towards the centre and interconnected with (2) #20 biscuits and glued. The finished face to be mounted in the centre and on top of the finished rays.
Pictures
Click on a picture to get a larger picture and then used the back button of the browser to return.
Westcoast carving knives: front to back, (2) push knives, (2) straight knives, (3) crooked knives1: Red cedar raw material2: End grain of 4" by 10" blank
3: Possible ways to glue the blank for the face4: Blank for face glued up5: Blank for face cut out, with enough left for the nose6: Back face hollowed7: Template face8: Rounding face9: Nose template with nose blank10: Nose glued to face11: Face blank completed12: Face work on nose13: Face work on nose14: Jig to hold face with the face down15: Jig in use while hollowing out back of the face16: Carving eye patches (area aruound the eyes)17: Thickness Caliper18: Thickness Calipe19: Carving mouth area20: Top view mouth area21: Bottom view mouth area22: Hollowed back23: Chin area24: Bottom view left cheek25: Side view left cheek26: Chin roughed out, cheeks shaped, eyes & eyebrows marked27: View from below28: Lips finished29: Preliminary nostril holes marked30: Nostril holes drilled out31: Drilled out from the back32: Nostril holes cut33: Nostril holes side view34: Eye ball & sides trimmed35: Eyes & eyebrows cut36: Back side finished face37: Front view finished face38: Side view finished face40: Shaping ray boards41: Shaping ray boards42: Ray board blanks43: Ray boards dry fitted44: Sunmask dry fitted45: Biscuit centres mark46: Biscuit slots cut47: Side rays with templates48: Side rays shaped49: Top & bottom rays with templates50: Top & bottom rays shaped51: Top eagle ray carved52: Bottom tail ray carved53: Left side salmon ray carved54: Left side eagle ray carved55: Face with main colour56: Top/bottom ray with main colour57: Side rays with main colour58: Face colours completed59: Top/bottom ray colours completed60: Side rays colours completed61: The ray factory62: Glued in two's and three's63: Glued bottom half64: All rays glued together65: Dowels in backside of face66: Completed Sun Mask height: 62" (157 cm) width: 58" (147 cm) high resolution67: Completed Sun Mask high resolution68: Sun Mask on the wall high resolution69: Sun Mask on the wall high resolution
These drawings are only a starting point for the project. You will notice differences between the drawings and the final results; that is called artistic license!
Drawing 01 - Complete front view
Drawing 02 - Arrangement of boards
Drawing 03 - Face; front and side view
Drawing 04 - Top & bottom centre rays
Drawing 05 - Long & short side rays
Drawing 06 - Overhead position of mask
Materials List (inches)
Here is the detail materials list. All wood is solid red cedar.
no.
description
length
width
thickness
suggested basic material, comments
1
face
18
18
4
Constructed and shape according to instructions.
1
nose
8½
8
4
Constructed and shape according to instructions and glued onto face.
1
eagle top ray
34
5½
¾
Shape according to instructions.
1
eagle tail bottom ray
28
5½
¾
Shape according to instructions.
6
eagle side ray
30
5½
¾
Shape according to instructions.
6
salmon side ray
24
5½
¾
Shape according to instructions.
28
Biscuit #20
To connect rays to each other
4
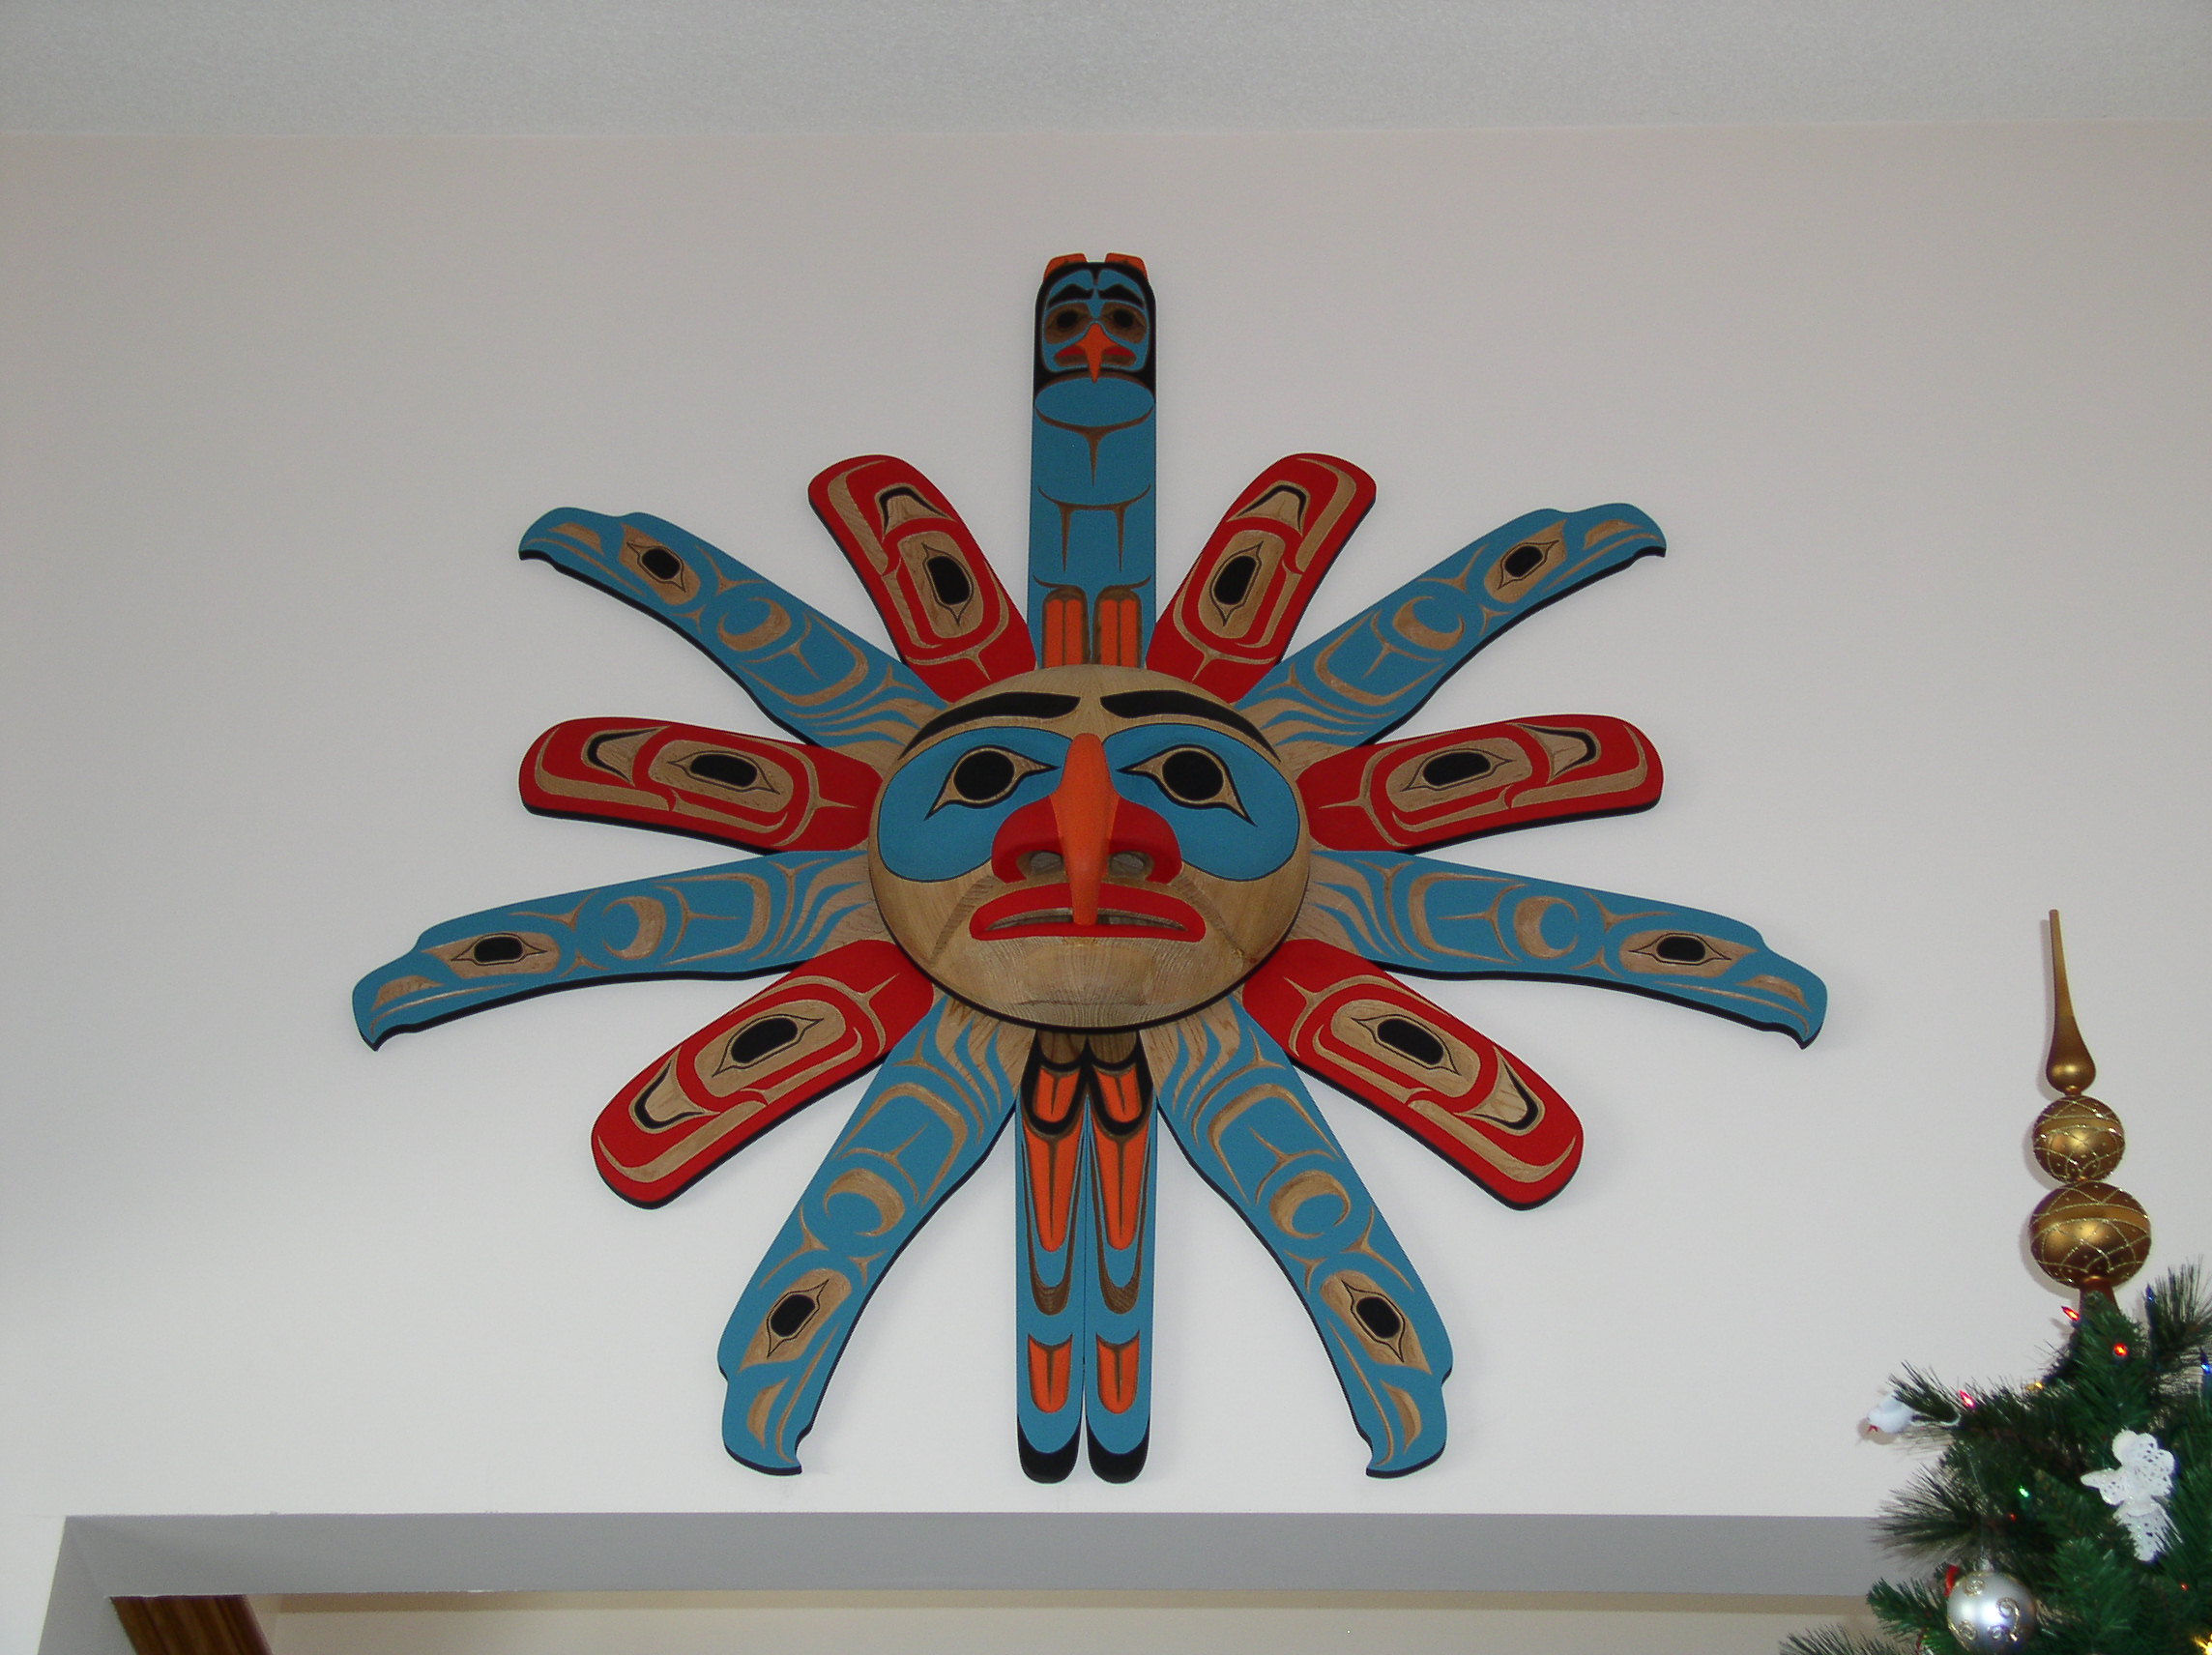
Dowel
2
3/8
To attach face to rays
Titebond III Ultimate Wood Glue
1 quart (1 liter)
Sanding sealer
A 50/50 mix of Lacquer Sanding Sealer and Lacquer Thinner. WARNING -- Extremely volatile/flamable; mix and apply outside (non-freezing weather) and away from flame and sparks !!! Let application dry for at least one hour before taking inside.
Jo Sonja's Artists' Colours; Velvet matte finish for decorative painting
blue (eagle bodies, face eye patches): Colony Blue red (salmon rays, lips, nostrils): Napthol Crimson Red brown (nose, beak, ears, eye outline): Vermilion black (eye brows, edges): Carbon Black
Raw Material
For the rays we used 5½" by ¾" clear red cedar (no knots). I used (7) 6 feet long boards.
For the face we used 4 feet long 10" by 4" red cedar as clear of knots and imprefections as we could get it.
Required Tools
Power tools - table saw, miter saw, band saw, planer, jointer, biscuit jointer, disc sander
Hand tools - chisels, Westcoast carving knives, high quality fine paint brushes
Other tools - 3/8" drill bit, 4 dowel centers
Construction
All measurements are in inches (1 inches = 2.54 cm) because all wood measurements in the shop are in inches. I recommend to cut, shape and sand all pieces and dry-fit them together. It is assumed that you are familiar with all your machines and craving tools. Check out the Workworking Tips section for basic machining tips of rough sawn wood.
February 15th, 2011, was the first day that saw dust was made for this project. To give an idea of the required construction and finishing time:
Activity
hours
Make templates; plane, joint, glue and shape blanks
30¼
Carve face
69¼
Carve 14 rays
55½
Sealing and painting
39¾
Final assembly and hanging
5¼
Total time
200
On December 19th, 2011, the Westcoast Sun Mask was placed in our living room.
Terminology
Before we begin it is important that we all speak the same language, so that when I use a term you know what I am talking about.
sun mask - the whole works, consisting of the (sun) face in the centre surrounded by 14 rays.
(sun) face - the centre piece that represents the sun.
centre top and bottom rays - the long top ray with the front facing eagle, and the short bottom ray with the tail feathers.
long side rays - showing the "en profile" eagles.
short side rays - showing the "en profile" salmons.
Carving Face
Face Blank -- The face blank is made from 4 feet long 10" by 4" red cedar. The first thing to do is to plane both surfaces smooth, and get the sides flat and smooth and perpendicular to the surfaces. Look at the end grain and compare to pictures 02 and 03. The "A" combination with the nose coming at the top, is the best configuration (in our case). Don't forget to look what the best place is for the cross cut in terms of knots, etc.. In our case we cut off a 20" length, matched it against the leftover piece, glued them together and clamped them overnight. The next day we drew a 18-1/4" circle on the good (i.e. top side) and cut that out using the band saw. We are lucky because the leftover piece is big enough for the nose later.
It is handy to make a full size template from poster board. The nose was cut out completely for later use. Little triangles are cut out to be able to transfer the lines to the face. picture 07
In the meantime start taking material away around the outside edge of the face and hollow out the back at the same time to minimize cracking. Slope the forehead backwards as from the eyebrows. Slope the left and right side toward the bask too, but make sure to stay well enough away from the nose area as that have to stay flat to glue the nose on. Reduce the thickness of the leftover piece of wood to about 3-1/8" using the planer. Use the nose template and trace it on the leftover piece of wood. Saw it out with the band saw. Next carve out (or use a rasp) the curve under the hawk-like nose -- this will make carving the lips later on much easier. Glue the nose blank onto the face blank. pictures 09, 10 and 11
Nose, Nostrils -- Next we give form to the nostrils; sort of an S-curve. Cut a little template to make sure that both nostrils have the same form. The centre of the nose is about 1/4" flat from the bridge of the nose all the way to the tip of nose; mark that with pencil. Round the nose over starting from the flat part. Then round over the top of the nostril towards the face surface starting about 1/2" from the bottom of the nostril. pictures 12 and 13
Draw a horizontal line on the face at the top of the nose. Draw a vertical line on the face to along the outside of each nostril. Finally draw a line around the face edge at about 1/2" from the back. Start rounding over from the horizontal and vertical lines towards the line on the edge. It is more gentle curve rather than a rounding! Obviously we keep a balance and also continue to hollow out the back as we know how far to go.
This sounds easy, but with the nose glued to the face you can no longer place the face with the front down. A second concern is the possibility of damaging the nose. We had some left over cut-offs from 6" x 6" posts for a gate project and used those. We used four pieces rounded over on the inside edge and which we toe-nailed onto our workbench into a square. On top of the four corners we nailed pieces of 2" x 4" such that the face fits easily between them -- even with a router mat draped over them -- and that the nose has a few inches clearance from the our contraption and workbench. The router mat minimizes damage to the front of the face while we are hollowing out the back. pictures 14 and 15
Eyes, Eye Patches -- Once the rounding over of the top and sides of the face is done we re-draw the eyebrows, the eye patches and the eyes themselves on the face. For the eyes we only need to draw a 3" circle (radius 1½") which represents the very outside of the eyelids as well. A point of warning about tracing the template. Due to the curvature of the face the template lines, especially on the side edges, need to be a bit further to the outside! With crooked knifes we dish out the area between the outside edge of the eyes and the edge of the eye patches. The centre of the dish is about 3/4" deep between nose and eye, and brow and eye, and about 1" deep under the eye and the outside of the eye, compared to the rest of the surrounding face surface. pictures 16
At the same time we continue the hollowing out at the matching point on the back. For now a thickness of about 1" is good enough. You can "feel" the thickness with your fingers of the left hand on one side and of the right hand on the other side. I just made my own thickness caliper from 1/4" thick plywood. You need two boards of about 24" by 5". Mark the center point, trace appropriate curves on it and cut out on the bandsaw. Select a small bolt and nut (3/8"), drill the centre hole and sand the sharp edges. Flip one side over and put the two pieces together. In a perfect world when the prongs of the caliper are touching on one side then the otherside should too; if not file off a bit from the prongs that are touching. Use one side on the to-be measured thickness and the other side of the caliper shows you the thickness. pictures 17 and 18
Right now the eyes are looking straight forward and are 3" round. The first step is to angle the eyes to the outside by leaving the inside of the eye where it is and making the outside of the eye deeper by about 1/4" while keeping the eye surface flat. The eye surface will become larger, but DO NOT CHANGE THAT AS YET! Next we want the eyes to look downwards a bit. Draw a line through the eye centre that is about 30 degrees of the vertical so that the eyes look down, but a bit to the left and right. Again leaving the top inside of the eye where it is and making the bottom outside of the eye deeper by about 1/4" while keeping the eye surface flat. Following the drawing/template the eyes are really a bit too close together, so we reposition the eye on the enlarged flat eye surface by drawing the 3" circle about 1/2" towards the outside and a bit lower. Take the excess material away from around the eyes.
Mouth Area -- Now we start work on the mouth area. The highest point of the lips is at the tip of the nose area and we leave that alone right now. From there we round over the mouth area to the left and right. On the drawing you see the black line going from the nostril around the mouth and we stay on the mouth side of that line at a 60 degree angle and straight down under the nostril, gradually deepening the sides of the mouth. Keep the hole mouth area vertical; don't angle it inwards to the chin. The lowest point of the mouth area at the far left and far right is about 1" from the back side. pictures 19
Once the mouth area is properly rounded to the left and the right, draw in the mouth again. Use a compass to make sure that the mouth is positioned correctly in relation to the nostrils, eyes and centre of the face. The area between the upper lip and nostrils is angled inwards towards the nostrils. The area below the lower lip is rounded inwards. For that we utilize a straight knife using 1/3 of the blade tip. Place the blade edge along the bottom lip line, push the blade into the wood along the line and at the same time twist the blade edge away from the lip like a scooping motion. This is called a rolling cut. Don't use too much force and do short sections at a time. Final depth should be at least 1/8" up to 1/4". Rest of the chin area is again vertical. pictures 20 and 21
The lips are parted in the middle. At this time drill a few 9/16" holes to the immediate left and right of the nose and perpendicular to the back side of the face. This helps in gauging the thickness behind the mouth while hollowing out the back area. For now we aim at a thickness of the face of 1". picture 22
After the hollowing we can drill more holes next to each other for the mouth opening, again perpendicular to the back side of the face. Use a chisel or knife to cut away the excess material, also under the nose. NOTE: the tip of the beak extends into the mouth, so take that into account! Finish the mouth opening edges with a fine wood rasp and once more perpendicular to the back side of the face. Leave the mouth corners where upper and lower lips meet as close together as possible.
Chin and Cheek Area -- By now the sub face material has dried enough and will not deform very much anymore. Verify that the drawn circle on the back is still 18" diameter. Using a disk sander with perpendicular feeder table, sand the face outside edge. Draw a line all the way around the outside edge at 1/2" from the back; we don't do any carving in that 1/2" wide area. On the bottom edge of the face draw a line starting at the far corner of the mouth (1" point), gently going up to the centre of the chin area where it levels off at 2" from the back of the face. Round over the centre 5" of the chin from the lower lip to the drawn line. Draw an oval shaped chin about 4" wide. Using a crooked knife to dish out the area between the lowerlip, cheek, chin and line drawn on the edge. picture 23
The cheek is the high area between the mouth edge, the edge of the nostril and the eye patch. On the mouth side of the cheek draw an S-shaped line starting where the nostril meets the actual face to the face edge at 1-1/2" from the face back. From there draw a gently curving line that ends about 7" to 8" up on the side and about 1/2" from the back of the face. Finally draw a line on the inside bottom section of the eye patch starting where the nostril meets the actual face and ending approximately on the eye patch edge opposite where the side line ends. This outlines the area of the cheek we have to take off, whereby the edge with the eye patch is sharp while it kind of curves towards the mouth and smoothes out towards the side edge. pictures 24 to 27
Lips -- The upper lip angles flat inwards. The lower lip is rounded over inwards. The mouth corners form a flat triangle and meets with the upper and lower lips at an angle. picture 28
Nostril holes -- Mark preliminary nostril holes under the nose. We use a 1" Forstner drill bit to drill in the centre of the preliminary hole. Start straight in and when there is enough "hold" angle towards the back of the face at approximately 60 degrees; about 2" will do. Turn the face over and mark the two places where to drill from the back to meet the holes drilled from the front. Use the centre of the face to mark the left and right distance. The distance from the mouth opening to the underside of the nostrils is about 1-1/2". When we mark the centre at 2-1/2" from the mouth opening we have drill about 1/2" into the nostril. With the same bit carefully drill out the holes until meeting the the holes drill from the front side. Use knifes to smooth the inside of the nostrils and widen out the front of the nostrils to the desired size. pictures 29 to 33
Eyes, Eyebrows -- Remember that the current eye circles represent the outside edge of the eyelids. Mark the eyelids, eye corners and eye balls. The eye corners should be about 3-1/8" away from the eye centre. The eye corners are carved trigons with the trigon centre about 1/8" outside the original edge towards the corner. Start cutting a small trigon and gradually enlarge it. The trigon is limited by the inside edge of the eyelids and the eyeball edge. Once that is carved cut a V-shape groove between the top of the eyeball and eyelid connecting the two trigons. Do the same at the bottom. Next make a cut around the eyebrows at a 60 degree angle and remove the material following the general direction of the forehead. pictures 34 and 35
Finishing -- The face is now roughed out, i.e. the face is shaped and all features carved, left and right are symetrical. Any bad spot(s) from cracks and/or knots are now filled with a good woodfiller of a matching colour. Most likely all surfaces have cut marks from carving. There are basically two ways to finish the face:
Use 220 to 300 grid sand paper to sand all surfaces. Advantage is very smooth surfaces. Disadvantage is that you risk rounding over sharp edges that need to stay sharp. Sanding reduces the value of the carving.
Use your carving knifes to level the high spots. Disadvantage is that is takes time and patience as you should take off only the most minute amount of wood. Advantage is that the finished carving has a much higher sale value. This is also the way I finished my carving.
This is the last opportunity to finish the hollowing out of the back. 1" to 3/4" thickness is perfect. Keep the back rim at a minimum of 1" because that is needed to attach the rays to the face. Use the thickness caliper and mark the spots where more material can be remove, like the areas under the eyebrows, the eyes, the cheeks and the nose. Either feel with your fingers and/or use the caliper. pictures 36 to 38
Carving Rays
Ray blanks -- While working on the face it is a good idea to sort the boards for the rays. The material list gives the number of boards and their total lengths. Each board is tapered where it joins the other boards in the centre. The taper begins in the centre on one end and ends at a certain distance from that end. For 5½" wide board that is:
distance = boardwidth / (2 x tangent(360 / (2 x Nrays))
distance = 5.5 / (2 x tangent(360 / (2 x 14))
distance = 5.5 / 0.45648
distance = 12.0485" or 12 3/64" or just shy of 12 1/16"
The easiest way to taper the boards is to use a crosscutting board on the table saw. Line up the taper of a ray board with the saw edge of the crosscutting board and secure the board with 3 or 4 finishing nails against the board edges, and then cut off the edge. Get as close to the taper lines drawn on the board as practical, but stay on the outside of the lines! pictures 40 to 42
Place all ray boards in a circle against each other on a flat surface, like the workshop floor. Set the jointer at a depth of 1/64" and pass each taper edge over the jointer. This is also the time to adjust the angle of the taper. If there is a gap in the center of the circle then you need to take 1/64" off from to outside of the taper up to nothing from the tip of the taper. If there is a gap on the outside of the circle then you need to take 1/64" off from the tip of the taper up to nothing on the outside of the taper. Always take off on both sides of the taper to prevent ending up with a lopsided board. Once everything fits together mark the boards in a logical way so that you know where each board will end up and which surface is the top side. pictures 43 and 44
On the sides of the tapered edges make a mark at 3" and 10" from the tip. These are the centres of the biscuit slots. Adjust the biscuit slot cutter to cut at about the centre of the board thickness and cut the biscuit slots for #20 biscuits. Make sure to use the top surface of the boards as the reference surface for cutting the biscuit slots. picture 45 and 46
Transfer the images of the 4 rays full-scale onto pieces of poster board. Cut out small triangles to be able to trace the templates onto the wood blanks. Shape the outside of the ray blanks with a band saw and smooth the edges with a 2" drum sander, fine wood rasp and 220 grid sandpaper. pictures 47 to 50
The eye corners are trigons and cut with a push knife. The eye patches are carved with the most crooked knife in a dished-out fashion. The other carving is done with a push knife, basically cutting V-grooves at a 45 degree angle. Wide V-grooves are 45 degree on one side and very shallow on the other side. For the shallow side you can use a push knife or a long straight knife to get a flat surface. All this is difficult to describe so have a close look at the pictures:
To finalize the carving some people use fine sandpaper to get rid of their carving marks. However, in general carve as smooth as you can and DON'T sand. This will increase the value of your work significantly!!!
Sealing, painting
Before sealing make sure that you erase all pencil marks, except those on the front of the rays at the innermost biscuit positions; you need those to line up the rays when glueing them together.
Sealing is done with a 50/50 mix of Lacquer Sanding Sealer and Lacquer Thinner using a bristle brush. Apply only to the fronts and side edges; this allows the backs to adjust to the seasonal humidity fluctuations. WARNING -- Extremely volatile/flamable; mix and apply outside (non-freezing weather) and away from flame and sparks!!! Let application dry for at least one hour before taking inside.
Suggested order of painting:
Colony Blue -- eye patches on face, eagle rays
Napthol Crimson Red -- salmon rays, lips; do nostrils after the nose is painted vermilion
Vermilion -- nose, beak, ears, tail feathers
Carbon Black -- eyes, eye browse, top eagle ray face, face side edge 1/2" wide, rays side edges
Titanium White -- eye accents (optional)
Use good quality brushes of various sizes. Practice on a piece of scrapwood to get the hang of it before you start on the actual rays and sun face. Colony Blue and Carbon Black usually need only one or two coats. Napthol Crimson Red definitely needs two coats and Vermilion at least three. Let dry at least 2 to 3 hours between coats; I often let each coat dry 24 hours. Optionally, if you like the "old" look, use a bit more water so that the woodgrain shines through. pictures 55 to 61
Final assembly and placing
We are almost done.
First we start with gluing the rays together. For that we need a large flat surface. I used my table saw top covered with a sheet of clear plastic; Water-based glue can seriously corroded the cast iron top! Next layout all rays on another surface (work bench, floor) and make sure that the rays are in the correct place!!! Don't go overboard, glue-up in two's and three's like I show in picture 62, using the biscuits. Do this in three batches. Make sure to clean up squeezed out glue immediately with a clean damp cloth; especially on the front side.
The next day glue the halves together consisting of two two's and one three's. Clamp a straightedge on you work surface to ensure that the bottom of the half arch is straight. In my case one half was concave by 1/16" and the other half convex by 1/16"; not a big deal. This is what a half looks like: picture 63.
Finally glue the two halves together and let that dry overnight. picture 64
Place the face on the center of the glued rays and make sure the face is straight up and exactly in the center of the rays. Put markers on face and rays so that it will be easy to put the face back in the right spot later. Next cut four 3/8" dowels at 2" long. Pre-drill four holes on the back of the face about one inch in from the edge and 1" deep while making sure that the holes are perpendicular to the back side of the face. Distribute the holes evenly, like top, bottom and left and right where the side eagle rays are. Put the dowel centers in the holes and carefully place the face in the right spot on the rays. Then push the face down to transfer the dowel centers onto the rays. Drill 3/8" holes in the rays. Dry-fit the dowels in the face and mark off the thickness of the rays on the dowels, trim each dowel in turn and glue it in place (picture 65). Dry-fit the face on the rays and make any adjustments to dowels or holes in the rays. DON'T GLUE YET.
Next it is decision time how to hang the sun mask. I like to use one #8 L-hook (or cornice hook). Unfortunately there was no stud behind the drywall where I needed it, so I used a #8 screw-in drywall anchor as a base for the #8 L-hook. It can handle 55 lbs of load which is plenty for our 18 lbs sun mask. Let the L-hook stick out a wee bit more than the thickness of the rays. On the back of the sun mask (the rays), about 2½" below the face top edge, I made a slot in the center of the top ray for the hook to go through. And now you can glue the face to the rays making sure that there is no gap between face and rays!
And finally, before actually hanging the sun mask, check for any paint damages during the final assembly and touch up the paint. Now you can relax and enjoy your art!!! pictures 66 to 69
In case you like to know
Weight of the 18" round and 4" thick face blank (moist) without nose was 8.0 kg (17.6 lbs)
Weight of the completed face (dry) 2½ kg (5.5 lbs)
Weight of the completed 14 rays (dry) 5½ kg (12.1 lbs)
Total weight of the completed Sun Mask after sealing and painting is 8.0 kg (17.6 lbs)
What went wrong
For carving the ideal wood should be quarter-sawn, i.e. the grain layers perpendicular to the surface. This carves the easiest. For the face I bought indeed that wood. However, I have bought boards for the rays where the grain basically runs parallel to the surface. Although it could produce interesting grain patterns, it is hell to carve. So be warned!
Conclusion
I knew that it would be a big project. What was challenging for me was that I don't like doing repetitive things like carving 6 rays the same, twice. And finally, painting is certainly not my favourite pastime either. Yet, once I saw the colours on the face and rays, and I put the rays together, the project was growing on me. When I looked at the sheer size of the sun mask with all its colours... IT WAS JUST MAGIC. Reactions I got were: huge, beautiful, brilliant, and "I have the perfect spot on my wall for it." Yes, I am quite happy that I did this project.
I like to acknowledge Rick Wolcott for mentoring me throughout the project, and the feedback from my woodcarving class mates.
References
Resources
Besides the excellent guidance from Rick Wolcott during the design and the execution of this project, I also consulted the following books for my education and ideas:
Learning by Designing -- Pacific Northwest Coast Native Indian Art, by Jim Gilbert & Karin Clark; ISBN 0-9692979-3-9 (my favourite)
Mythic Beings -- Spirit Art of the Northwest Coast, by Garry Wyatt; ISBN 0-295-97798-1 (another favourite)
Lelooska, The Traditional Art of the Mask -- Carving a Transformation Mask, by Douglas Congdon-Martin; ISBN 0-7643-0028-8
Learning by Doing -- Northwest Coast Native Indian Art, by Karin Clark & Jim Gilbert; ISBN 0-9692979-1-2
Carving Totem Poles & Masks, by Alan & Gill Bridgewater; ISBN 0-8069-8214-4
The last three books are essential if you don't have an experience Northwest Coast Native carving instructor!


