King-size Bed -- 160 hours -- Can$ 1,110.00 -- Intermediate
We are ready to replace our master bedroom furniture. Knowing my wife's taste that would be expensive. I figure that given the time, I can make something unique that we both like, that is perhaps cheaper, and rock solid.
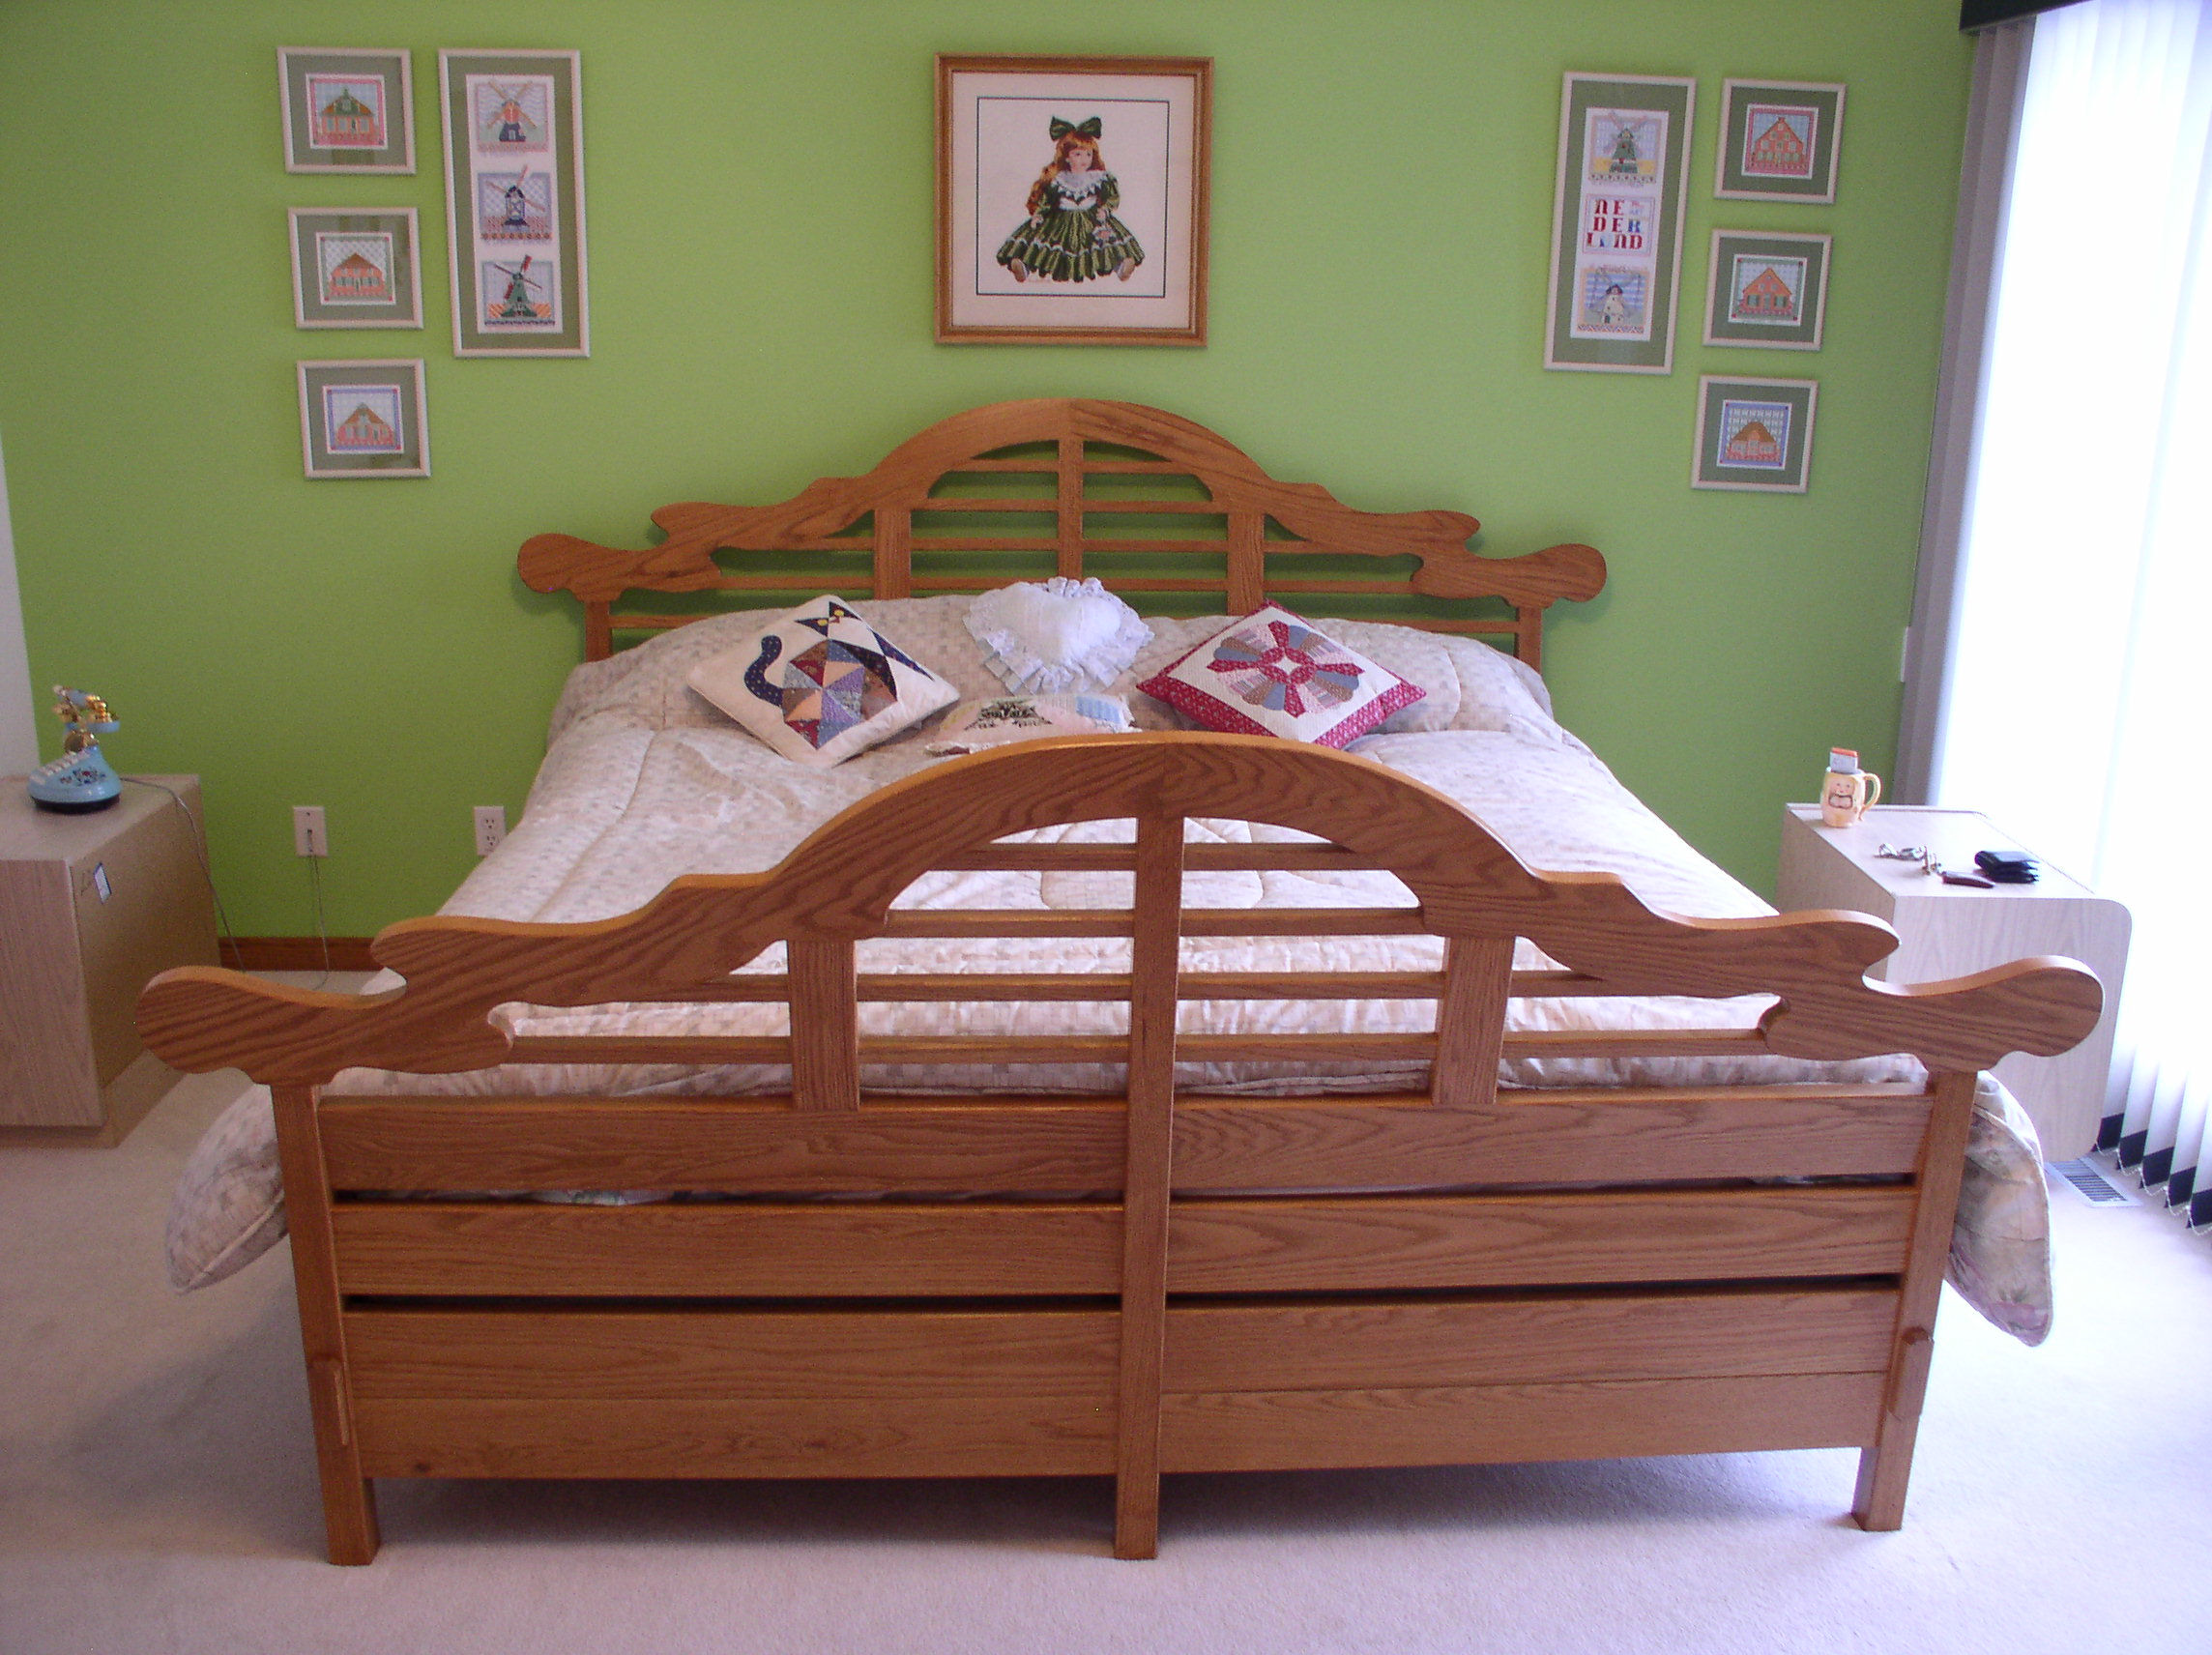
The first item that catches your eye in a master bedroom is the King-size Bed. I decided to design the king-size bed first using a version of the back of the Lutyens' Bench as the head board and a lower one as the foot board. Using the Lutyens' Bench plan from the New Yankee Workshop, and armed with the knowledge of Jeff Miller's book "Beds" I was ready for the project. An official standard king-size bed is 80" by 76" -- ours is only 79-1/2" by 75-1/2" -- so I figure that an inside frame size of 80-1/4" by 76-1/8" should be sufficient. We also wanted to keep the top of the mattress at the same height. With that information I started the design and made the drawings to work from.
The end result is a king-size bed that consists of five pieces: a headboard, a footboard, two site boards and a centre support piece. Everything will be made from red oak, except for the centre support and the cleats which will be poplar. The side boards attach to the headboard and footboard with four bolts and nuts. All wood joints are mortise and tenon and are sized according to the capability of the Leigh Frame Mortise and Tenon jig. Unfortunately, the mortises in the decorative boards cannot be made with the Leigh jig due to their irregular shape, and have to be made by hand.
The time reflects construction and finishing time. Design and drawing time is not included.
Click on a picture to get a larger picture and then used the back button of the browser to return.
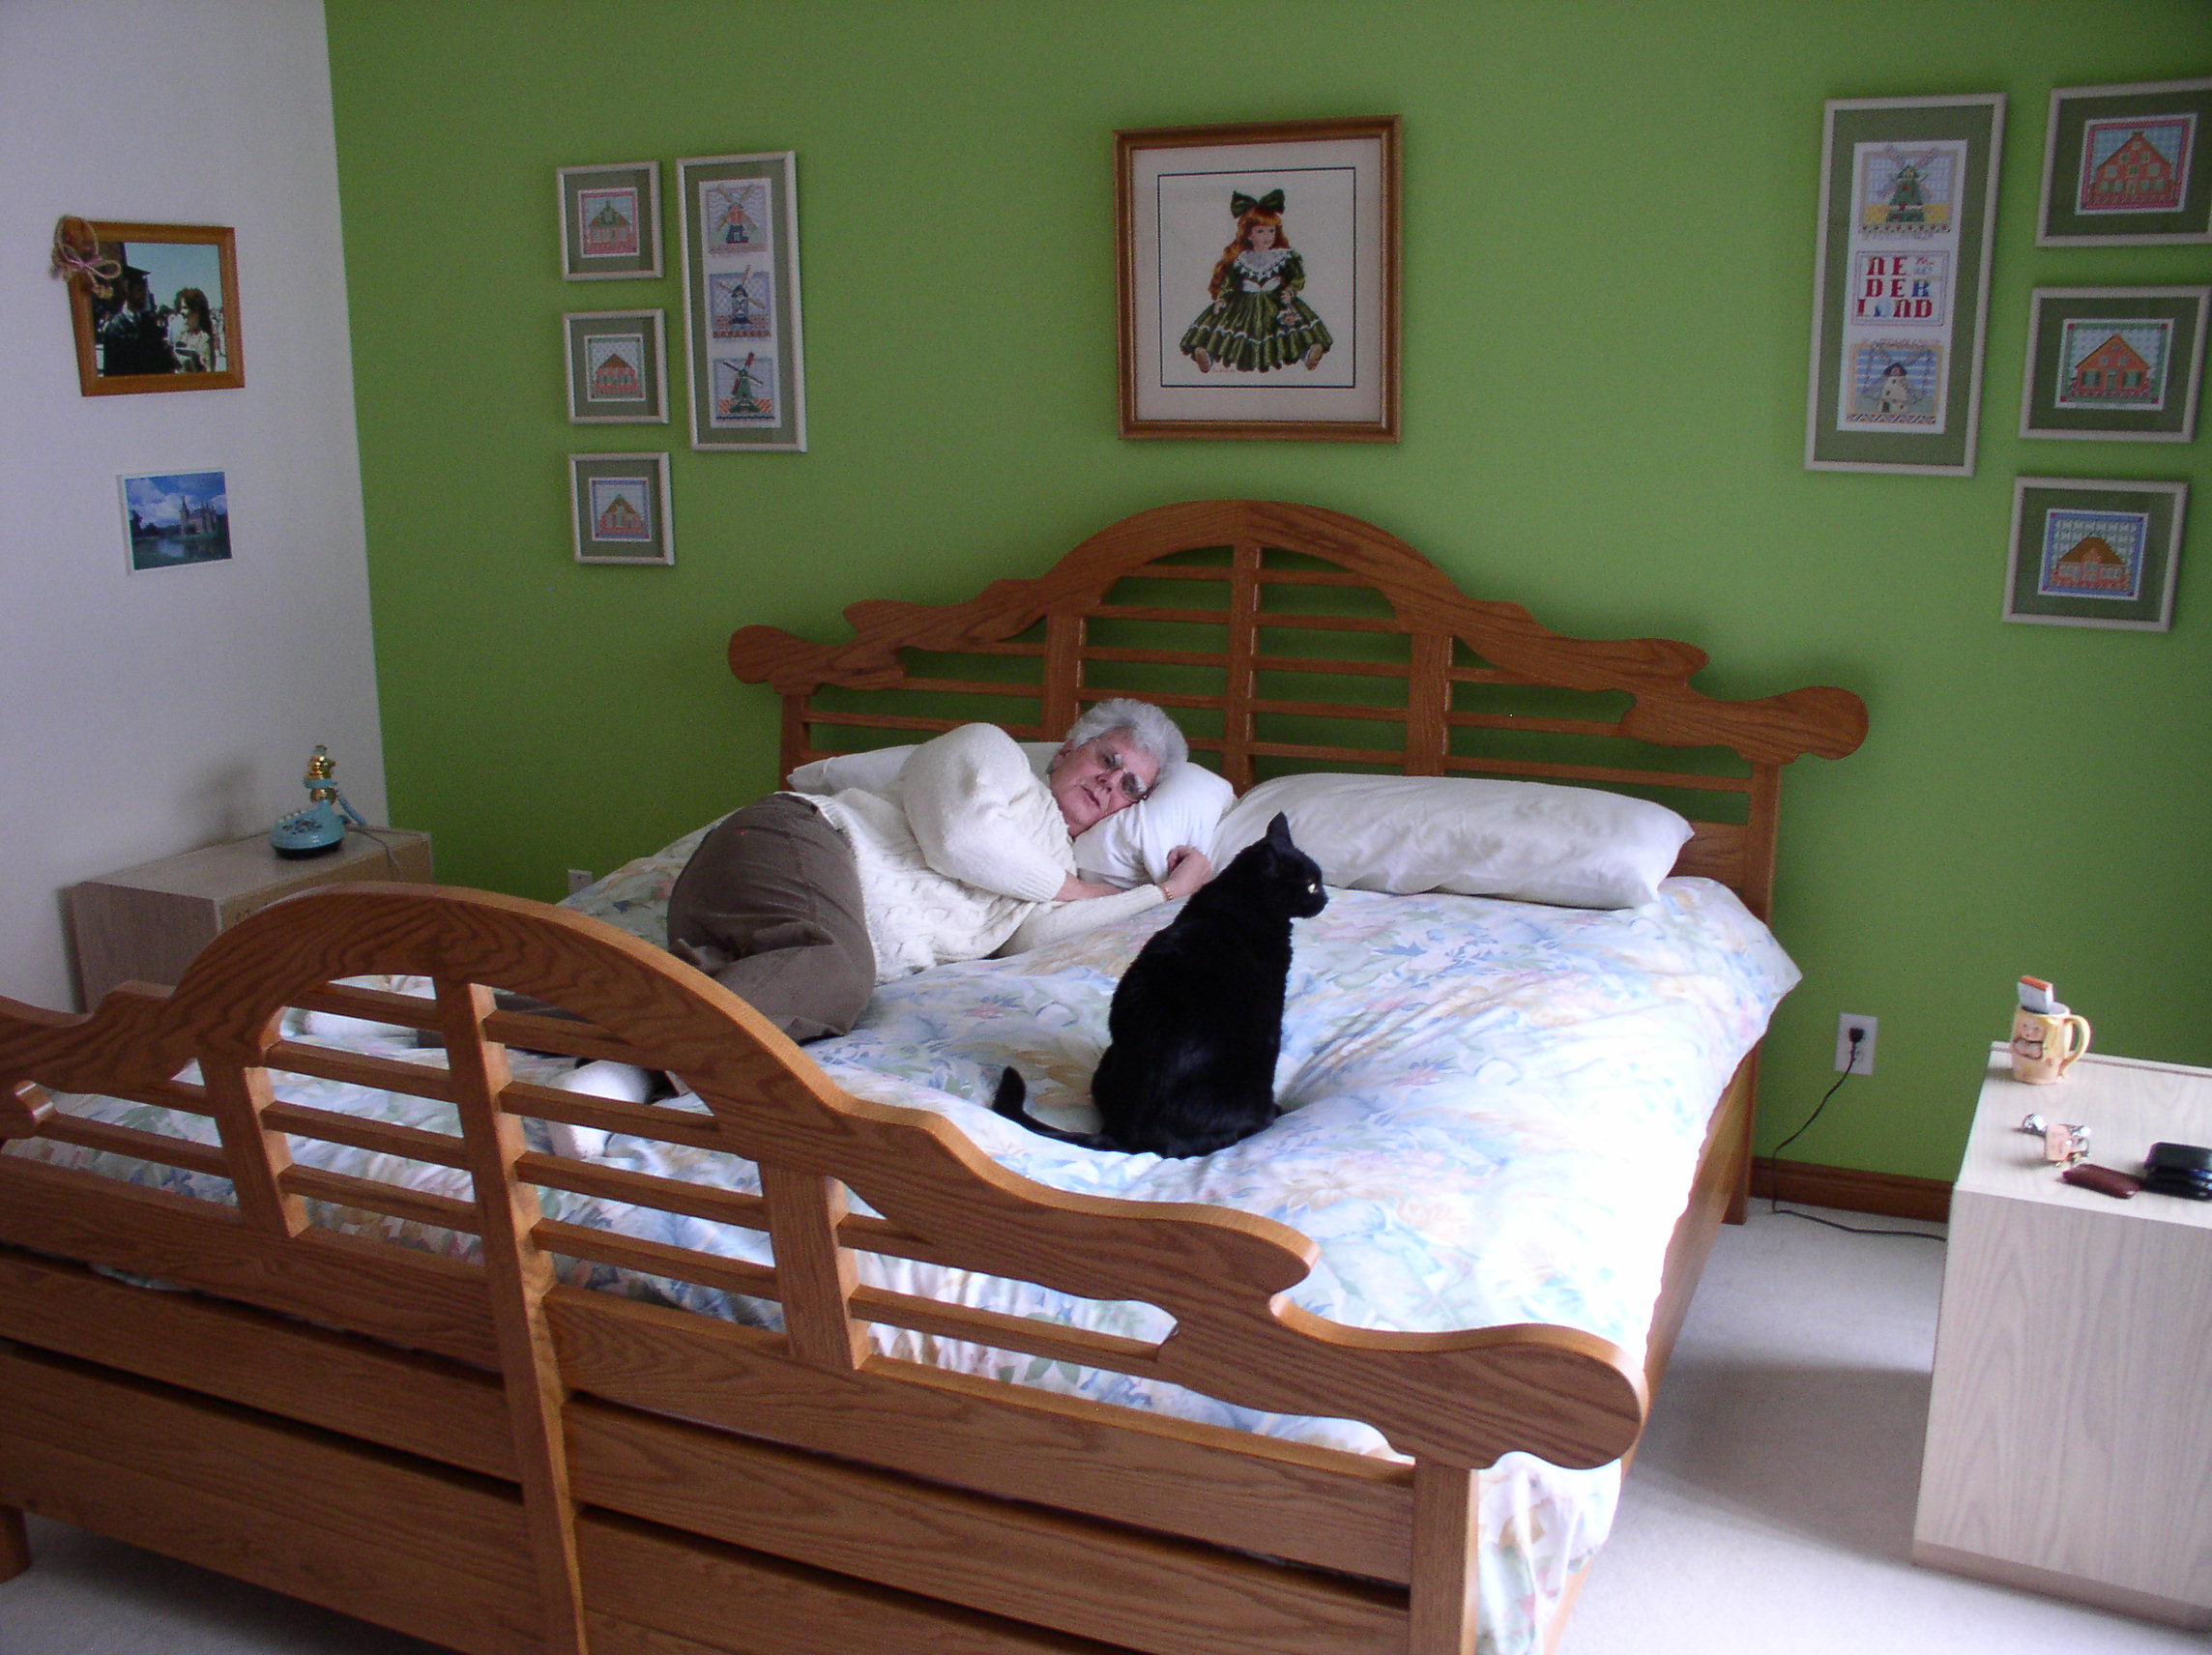
1: Rough sawn lumber; notice the warped stock2: Template decorative board; notice the marks for slats, posts, and vertical support3: Template of headboard centre post4: Hardware: bolt, washers, lock nut5:Posts shaped6: Rails and vertical supports ready for jointing and thickness planing7: Mortise side posts8: Detail side rail ends9: Side rail glue-up10: Detail side rail end11: Dry-fitted side rails and side posts12: Leigh FMT jig setup while cutting rail tenons13: Rails with tenons14: Leigh FMT jig setup with custom made bracket to support odd shaped posts15: Posts with mortises for rails16: Posts, vertical supports and slats with tenons and mortises17: Glue-up bottom rails and centre post of one side of footboard18: Decorative boards planed19: Decorative boards shaped; showing sanding drums20: Dry fitting whole bed after partial head/footboard glue up21: Leigh FMT setup for decorative boards22: Decorative boards dry-fitted to head/footboard23: Drill press setup for mortise drilling24: Glueing side posts to head/footboards25: Shaping a slat to the contour of a decorative board26: Slat and decorative board shaped27: Glueing decorative boards to footboard28: Finished headboard29: End of construction30: A pile of cutoffs, discards and test pieces. Not shown are 11 garbage bags with saw dust and shavings.31: Bolt covers32: Headboard stained and varnished33: King-size bed set up High resolution (675 KB)34: King-size bed made up High resolution (668 KB)35: King-size bed used High resolution (671 KB)
Plans, Drawings, Sketches (inches)
Click on a drawing to view the letter-size (8½" x 11") drawing in "pdf" format. Requires the free Abode Reader, which can also be used for printing the drawing.
Drawing 1 -- This drawing shows roughly what we try to accomplish. Unfortunately it contains a few minor errors, like the spacing between the slats of the headboard should all be equal. But it still gives a good idea until the pictures of the real thing are available.
Drawing 2 -- Top view of the spring box bed frame.
Drawing 3 -- Front view of the head/footboard.
Drawing 4 -- Template for decorative board with location of posts, vertical support and slats.
Drawing 5 -- Side view of the headboard posts and vertical support.
Drawing 6 -- Side view of the footboard posts and vertical support.
Drawing 7 -- Detail view of the side post and side rail joint with bolt and nut.
Drawing 8 -- Detail view of the centre support and cleat joint using only a dowel.
Materials List (inches)
Everything is solid red oak, except the centre support and the cleats which are poplar.
no.
description
length
width
thickness
suggested basic material, comments
1
headboard centre post
49-1/2
3-3/4
2
shape according to headboard posts drawing
2
headboard side posts
36-1/2
2-1/2
2
shape according to headboard posts drawing
1
footboard centre post
42
3-1/2
2
shape according to footboard posts drawing
2
footboard side posts
28-3/4
2-1/2
2
shape according to footboard posts drawing
1
centre support post
5-3/4
2
2
5" long with a 3/4" long 1-1/2" x 1-1/2" tenon on centre on one end
2
side cleats
78-1/2
1-1/2
1-1/2
(poplar)
2
head/footboard cleats
74-3/8
1-1/2
1-1/2
(poplar)
1
centre support
78-3/4
3
1-1/2
(poplar)
4
decorative head/footboards
48
8-3/4
1-1/4
shape according to template drawing
2
headboard vertical supports
14-3/4
3
1-1/4
11-3/4" long with a 1-1/2" long 1/2" x 2-1/2" tenon on centre on each end
2
footboard vertical supports
11-9/16
3
1-1/4
8-9/16" long with a 1-1/2" long 1/2" x 2-1/2" tenon on centre on each end
18
head/footboard rails
38-7/16
4-1/2
1-1/4
36-11/16" long with a 7/8" long 1/2" x 4" tenon on centre on each end
4
side rails
80-1/2
4-1/2
1-1/4
79-1/2" long with a 1/2" long 3/4" x 8-1/2" tenon on centre over two boards on each end
28
head/footboard slats
total about 34 ft
various lengths with a 3/4" long 5/16" x 3/4" tenon on centre, and shaped according to contour of decorative boards. Slats that meet the decorative board have 1" extra in overall length for shaping.
2
23-3/16
1
1
21-11/16" long with a 3/4" long 5/16" x 3/4" tenon on centre on each end.
10
13-1/2
1
1
12" long with a 3/4" long 5/16" x 3/4" tenon on centre on each end.
4
16
1
1
13-1/2" long with a 3/4" long 5/16" x 3/4" tenon on centre on one end. Shaped on other end.
4
11-1/2
1
1
9" long with a 3/4" long 5/16" x 3/4" tenon on centre on one end. Shaped on other end.
4
14-1/16
1
1
11-9/16" long with a 3/4" long 5/16" x 3/4" tenon on centre on one end. Shaped on other end.
4
11-7/16
1
1
8-15/16" long with a 3/4" long 5/16" x 3/4" tenon on centre on one end. Shaped on other end.
4
decorative bolt covers
4-7/8
1-5/8
5/8
see construction for more details
4
hex-head bolts, lock nuts, washers
6
5/16
Each bolt needs two washers; one with 3/4" outside diameter for in the side rail, and one with a 1-1/4" outside diameter for in the side post
4
rare earth magnets
1/2
1/8
to fasten decorative bolt covers; Lee Valley 99K31.03
4
steel cups
5/8
1/4
to hold magnets; Lee Valley 99K32.53
4
screws, flat head
1/2
#4
to screw steel cups to bolt covers
46
biscuits
#20
to join rails together, and join cleats to rails
12
finishing nails
1
to fix shaped end of slats to decorative boards
LePage carpenter's glue
yellow, cabinet maker's quality
Woodwise red oak wood patch CP308
Found this filler at Windsor Plywood
wood stain
Acrylic Urethane Varnish, satin finish
In order to keep cost under control, I ordered rough sawn stock. Obviously, you can only do that when you have the woodworking machines to mill the stock, i.e. table saw, planer and jointer. Here is the list of rough sawn stock. Mind you, you normally don't have very much control over lengths and width, and you can expect some waste/surplus. On the other hand it gives you the chance to select the best part from the rough stock.
no.
description
length
width
thickness
purpose
1
red oak
8 ft
4"
10/4
posts
2
red oak
6 ft
3"
10/4
2
red oak
8 ft
8-3/4"
6/4
decorative boards
1
red oak
5 ft
3"
6/4
vertical supports
13
red oak
7 ft
4-1/2"
6/4
rails
1
red oak
8 ft
5"
6/4
slats
2
poplar
7 ft
6"
8/4
centre support, cleats
And indeed, what I ended up with was each board being 10+ feet long, and several being substantially wider than I needed. By working smart I was able to have some stock left over for building the night stands at a later date. The above list indicates that at a minimum about 105 boardfeet is needed. Based on the given stock and cutting plan I expect to use about 134 boardfeet.
Required Tools
Power tools -- table saw, miter saw, planer, jointer, biscuit saw, router, drill press, disc sander, random orbit sander
Jigs -- Leigh Frame Mortise and Tenon (FMT) jig, 1/2" spiral upcut router bit (Leigh 180CL), 5/16" spiral upcut router bit (Leigh 170-500C), matching joint guides
Router bits -- 3/16" radius core box bit (Lee Valley 16J15.03), 45° chamfer bit (Lee Valley 16J30.08), 1/2" straight plunge bit (Lee Valley 16J06.08)
Miscellaneous -- 3/4" and 1-1/2" sanding drums; 1/2" lipped brad-point drill bit
Construction
All measurements are in inches (1 inches = 2.54 cm) because all wood measurements in the shop are in inches. I recommend to cut, shape and sand all pieces and dry-fit them together with clamps.
I my opinion the clock starts ticking from the moment I pick up the lumber, because from that moment on everything is under my control. Stack the rough sawn red oak and poplar in the workshop with thin slats between each board to let them adjust to the temperature and humidity of the workshop for at least a week, but preferably 2 to 4 weeks. Check the lumber for staples and remove them so that you don't ruin any sharp blades! Measure the lumber and make a list for later use.
Before doing any machining it is important to make a cutting plan. Take the list of measured lumber and decide on the most economical way to cut each piece up into the various parts needed for the bed. Give yourself 3 to 4 inches on each end of lumber, or 6 to 8 inches extra, because when you run material through the planer it often have some indentation in the first few inches; also called snipe.
This is roughly the order in which I did the work.
bed part(s)
hours
pick up, sort and stack lumber
2-1/2
make templates and cutting plan
6-3/4
cut and shape bedposts, top tenons
13-1/4
cut and shape rails, vertical supports
11-1/2
join side rails and side posts with mortises and tenons, and slots for bolts/nuts
12-1/2
join head/footboard rails, posts and vertical supports with tenons and mortises
20-1/4
shape and cut slats
8-1/4
final sanding posts and head/footboard rails, glue rails to bottom part of centre posts; glue vertical supports/top rails/slats
5-1/4
cut and shape decorative boards & join to head/footboards with tenons and mortises
27-1/4
join remaining slats to head/footboards with tenons and mortises, final glue up, final sanding/chamfer top face side of head/footboard
27-1/2
cut and shape cleats and centre support, and glue cleats to rails
8-1/4
bolt covers
2-1/4
stain & varnish
14-1/4
Terminology & Assumptions
Before we begin it is important that we all speak the same language, so that when I use a term you know what I am talking about.
face/back -- the face of the posts, headboard and footboard is the side that faces inside towards the bed. The back side faces to the outside.
top/bottom section -- the posts, headboard and footboard consist of a top and a bottom section. The top section leans back 10°.
bending point -- the point where the bottom section start leaning back 10° and becomes the top section.
Note that the parts of the top of the headboard and the footboard are all flush with each other on the face side, i.e. top face part of the posts, the top rails, the vertical supports, the decorative boards, and the slats. Chamfering of the edged on the face side of the top part of the head/footboards is done after all the pieces are glued together.
Secondly, it is assumed that you are familiar with the Leigh Frame Mortise and Tenon jig, how to set it up and make test joints for proper fit. Only tenon lengths are given, but matching mortises should be at least 1/16" deeper.
Templates
While the rough sawn stock is acclimatizing to the workshop environment, it is the best time to make a few templates. Thick poster board will do, but I use matting material left over from framing pictures.
Template for the decorative boards -- Use drawing 4. Don't forget to mark on the template the exact locations where posts, vertical support and slats meet the decorative board.
Template for the headboard centre post -- Use drawing 5 following the temporary construction line. The extra material on the back of the post we add when the post is laid out on the red oak board. Although there are 4 different posts, only one template is needed as that can be used also for the other posts by following the instructions further down. Don't forget to mark on the template the centres of the mortises for rails and slats.
Bed Posts
Cut the lengths for the bed posts from the 10/4 stock. Don't forget to include the short centre support post. Joint one face of each board so that they are smooth and flat. Next run the boards through the planer to get the other side parallel to the first one. Then alternate running the two sides through the planer until the desired thickness of 2". Flipping the boards over helps to minimize wrapping of the finished boards. Also remember when jointing and planing that you have to cut with the grain, i.e. the knifes should come out of the wood and should not go into the wood. I put markings on the end grain of each board so I can easily see how I should feed a board. I also mark the end grain of each board to indicate which part it is, e.g. HCP stands for Headboard centre Post.
Lay-out the head/footboard posts on the boards using the post template and the measurements from drawings 5 and 6. Make sure that the grain direction is about as indicated on the drawing. On the back of the two centre posts mark a point 10" from the bottom and a point 9" from the shoulder at the top, and connect those two points. This give extra material and adds strength to the centre posts. Using the table saw with a taper jig and/or a band saw cut out the posts leaving about a 1/16" on each side for finishing. Don't shape the tenons on top of the posts as yet. Run the face side of the posts over the jointer so that they are straight and perpendicular to the sides. I typically make two passes taking off 1/32" with each pass. Accurate bottom and top face measurements is important as that ensures the correct spacing between rails and between slats later on. The actual angle between the top and bottom of the posts is 170° (leaning back 10°), but the exact angle is not very important as long as all the headboard posts have the same angle and all the footboard posts have the same angle. The side posts are 13-3/16" shorter than its matching centre post measured from tenon shoulder to tenon shoulder. The last step is to cut a 1/2" thick tenon on each post over the full width of the post and exactly 3/8" in from the face of the post. The tenon is 2-1/2" long.
The back side of the posts is more difficult to finish. I used the disk sander first to get the back side sections straight and perpendicular to the sides, and then finish it off with my random orbit sander with #220 grid sand paper. The back side bending points end up slightly rounded, which is just fine.
Finally joint the centre support post to 2" square, and trim it to a length of 5-3/4". Make on one end a 1-1/2" by 1-1/2" tenon on centre, 3/4" long.
Rails, Vertical Supports
Cut the approximate lengths of the headboard rails, footboard rails, side rails, and the vertical supports. Joint one face and plane to 1-1/4" thickness. Joint one edge, rip to width plus 1/16", and make two passes with the sawn edge over the jointer, taking off 1/32" with each pass.
Now it is time to join the side rails to the side posts. For that a 3/4" by 8-1/2" mortise is needed on the face side of the bottom of the side post. I used my router with a 1/2" outer diameter template guide and a 3/8" spiral upcut bit. Make a template with rectangular opening of 7/8" by 8-5/8"; see picture 7. The centre of this opening should be 9-1/2" from the bottom and on centre of the width of the side post. Clamp a side post and template in a vise and route the mortise 1/2" deep.
Measure a point 9-1/2" from the bottom and on centre of the width on the back site of the side posts. This is the place where the bolt will go through and attach the side posts to the side rails. Based on the hardware I bought I drilled a counterbored hole with diameter of 1-3/8" and 3/8" deep so that the washer and bolt head are below the back surface. Next drill a 11/32" hole through the centre of the counterbored hole and that ends at the centre of the mortise on the face side of the post.
Trim the side rails to the exact length 80-1/2". Match the side rails together; two for each side of the bed. Mark the boards top and bottom board, and mark them inside/outside face. Where the two edges meet there will be 7 biscuit joints. Mark the centre of the biscuits on the edges starting in the centre and spaced them 11" apart. Cut the biscuit slots using the outside face of the rails as the reference surface. Dry-fit the side rails with the biscuits. Turn the dry-fitted side rails with the inside up. Based on my hardware mark a point at 4-5/8" from each end at the centre where the two rails meet. That is the location of the "D" slot for the washer and nut (see drawing 7). Drill a 1-1/8" deep counterbored hole at the marked locations using a 1" Forstner bit. Clean up (square) the two corners closest to the end of the rails with a chisel to form the straight edge of the "D". Take the rails apart. Using a 3/16" radius core box bit in the router table, route a 3/16" deep slot on each end of the rails from the end to the "D" slot. I found this method much easier than drilling a 3/8" hole by hand in long grain wood. Finally using a 45° chamfer bit route a 3/32" edge on all the long edges of the side rails, except on the inside bottom edge of the bottom rail. That is the place where we have to glue the cleats later.
Glue-up the side rails with the biscuits making sure that the ends of the rails are flush. Use plenty of clamps. When the glue is dry route a 3/4" by 8-1/2" tenon on each end, 1/2" long. Do a dry-fit with the side posts. This is a good time to also mark the side posts as left and right; I do that on the top tenon. The bottom of the side rails should be exactly 5" above the bottom of the side posts, while the width of the tenons on the side rails should be about 1/16" smaller then the width of mortises to allow wood shrinking and expansion. Thus if the mortise is 8-1/2" then the tenon should be at most 8-7/16".
Headboard, Footboard
Trim the headboard and footboard rails to the exact length of 38-7/16". Set up the Leigh FMT jig with a 1/2" by 2-1/2" joint guide, and use a plunge router with 1/2" spiral upcut bit. Mark one face off each rail as the reference surface that will be placed against the Leigh FMT clamp plate. Then cut 1/2" by 4" tenons on centre that are 7/8" long on both ends of the headboard and footboard rails. After cutting the tenons don't change the setting of the Leigh FMT.
On the face of the headboard centre post mark the centres of the required mortises according to the measurements from the following table:
headboard post
footboard post
measured from shoulder of post
measured from shoulder of post
2-1/8
slat
2-1/8
slat
5-5/16
slat
5-5/16
slat
8-1/2
slat
8-1/2
slat
11-11/16
slat
11-11/16
slat
14-7/8
slat
16-5/8
rail
19-13/16
rail
bending point
bending point
21-3/4
rail
17-1/4
rail
17-1/4
rail
11-3/4
rail
11-3/4
rail
7-1/4
rail
7-1/4
rail
measured from bottom of post
measured from bottom of post
Clamp the headboard side posts to the left and right of the centre post with the faces flush and the bottom end of the posts flush. Using a square extend the markings over the full width of the centre post and a bit on the adjacent side post. Unclamp. Using a square and using the face of the posts as the reference surface extend the markings to the inside side of the side posts and to both sides of the centre post. Repeat for the footboard posts.
First make a bracket to properly support the odd shaped bed posts. See the Leigh FMT user guide. First cut the 1/2" by 4" mortises that are a wee bit deeper than 7/8" on the top part of the posts using the face as the reference surface. Then cut the same mortises on the bottom part of posts but now 1" on centre from the face of the posts. Give the sharp edges of the mortises a light sanding.
The next step is dry-fit the rails and the bed posts, where the marked face of the rails should face to the inside of the bed. I suggest to use the least nice rails as the bottom rails of the headboard because the that part is most likely put against a wall and nobody sees it anyway. Once that is done label all the rails. For example, I label the left rails of the headboards on the left tenons from top to bottom as HL1, HL2, HL3, HL4 and HL5.
Where two edges of rails meet (rails 2 and 3, and rails 4 and 5 of the headboard, and rails 3 and 4 of the footboard) there will be one biscuit joint in the centre of those edges. Not so much for structural strength, but more in case a rail has a tendency to warp.
Next the biscuit slots will be cut in the bottom rails of the headboard and footboard and side rails for attaching the cleats later on. Adjust the biscuit saw to cut biscuit slots at 3/4" from the bottom edge. Obviously the biscuit slots will be on the inside of the rails where the cleats will come. On the head/footboard bottom rails there will be 3 slots, in the centre and 12-1/2" to either side. On the bottom side rails there will be 7 slots, in the centre and the others spaced at 12" on centre. After cutting the slots leave the pencil markings on the bottom edges so that it will be easy to copy those to the cleats later. Don't change the setting of the biscuit saw either as that same setting is needed later for the cleats.
Cut the vertical support pieces to length, and mark one face off each as the reference surface that will be placed against the Leigh FMT clamp plate. Using the same Leigh FTM setup (1/2" by 2-1/2" guide, 1/2" spiral upcut router bit) cut a tenon on each end of 1/2" by 2-1/2" on centre and 1-1/2" long. Next cut a matching mortise on the top edge of the top headboard rails and top footboard rails at 13-1/2" on centre from the centre post. Label the vertical support pieces, e.g. HL, FR, etc.. Dry-fit the top rails in the centre posts and copy the centre of the slat marks from the centre posts onto the vertical support.
Finally using a 45° chamfer bit route a 3/32" edge on all the edges of the posts, head/footboard rails, and vertical supports, except:
the top face edges of the posts, as those need to be flush with the slats later;
the inside bottom edge of the bottom rails, as that is the place where we have to glue the cleats later;
the top edges of the top rails, as those need to be flush with vertical supports later;
the inside (face side) of the vertical supports, as those need to be flush with the slats later.
Slats
Select sufficient cut off pieces of the 6/4" rough stock to mill the slats. Joint one face of all the pieces straight, and then plane it down to about 1-1/16". Joint one edge straight and square, and rip a strip on the table saw of 1-1/16" wide. Repeat for the remaining part of each piece. Plane the sawn side and one perpendicular side down to 1". This method ensures perfect square slats. Cut 10 slats off exactly 13-1/2" long and mark one side as the face side. Setup the Leigh FMT with the 5/16" by 3/4" joint guide and a 5/16" spiral upcut bit. Cut 5/16" by 3/4" tenons with a length of 3/4" on centre on both ends of the 10 slats. Chamfer the back edges of the slats. Cut the remaining slats to the approximate length (see material list) and mark one side as the face side. These will be fitted later.
Using the same Leigh FMT setup create the mortises for the slats on the vertical supports and the top part of the bed post. Make sure that the depth is a wee bit more than 3/4".
Glue Bottom Rails to centre Posts
Erase any pencil marks from the posts and the head/footboard rails, except on the bottom of the lowest rail (those markings need to be transferred to the cleats later). Sand all sides of the posts and rails. I use a sanding block with 220 grid sand paper because the jointer and planer leave a very smooth surface already and only a little bit of sanding is needed. If more sanding is needed then a random orbit sander is recommended.
Find a flat area where the head/foot board can be glued together. Starting with the left side of the footboard we only glue the bottom three rails to the centre post, but we put in the top rail as well and slide the left side post over the tenons on the other ends of the rails to give everything structure. Don't forget to glue in a biscuit between the bottom two rails. Clamp and make sure that the centre post is square to the bottom rail. Don't glue the top rail or the side post, because you will not be able to put in the vertical support and slats later. See also picture 17.
After the glue of the left side is dry -- I leave it clamped for at least one hour --, glue the bottom three rails to the right side of the centre post, again place the top rail and side post for structure and clamp. Check that the bottom rail is square with the centre post. Check also that face and the bottom of the three posts are all lined up.
Do the same for the left and right sides of the headboard, but now for the bottom four rails, and with biscuit between each of the rail pairs.
Glue Top Rail, Vertical Support, centre Slats
Beginning with the left side of the footboard glue, all at the same time, the vertical support to the top rail and the two centre slats to the vertical support. Slide everything into the centre post, and slide the side post over the other end. Do not glue to the centre post or the side post!!! Clamp everything, making sure that the vertical support is tightly clamped against the top rail and that the slats are tightly clamped between vertical support and centre post. Once dry do the same for the right side of the footboard. Then do the same for the headboard using three centre slats on each side.
Dry-fit the whole bed
This is a good point to dry-fit the whole bed before completing the remaining stuff of the footboard and headboard. Check also the template for the decorative boards to make sure that a accurate enough job was done so far. See picture 20.
Decorative Boards
Cut the rough lumber for the required size for the four decorative boards. Joint and plane them to the 1-1/4" thickness. Trace the template on the boards and saw them out using a band saw just outside the outline. Leave about 1/8" extra material where two decorative boards will meet later. Sand the edges smooth using 1-1/2" round by 2" long and 3/4" round and 2" long sanding drums. Do not yet sand the edges where the decorative boards meets the posts and the vertical supports.
Mark the centre of the centre post on the face side where the shoulder of the tenon is. Trim the edges of the decorative boards where they meet in the centre of the centre post, such that there is little or no gap between them.
Put the decorative boards against the tenons of the posts on the face side of the footboard, letting them rest on the shoulder of the tenons. Mark the face of each board FL and FR. Clamp the right side and work on the left side. Sight where the left decorative board meets the three shoulders. Those spots need to be meet the shoulders such that there is little or no gap between them. Those spots need also to be square to the face of the decorative board. I used a disk sander for that. Work very slowly taking off only very little at a time. Keep also an eye on the gap between the two decorative boards to ensure that it stays close. Do the same for the right side, and the headboard.
Time the make the mortises in the decorative boards. Clamp the decorative boards to the footboard and trace where the side post and vertical support meet the decorative boards. Do the same for the headboard. Use these markings to determine the centres where the side post and the vertical support meet the decorative board. Draw also a line through the centres parallel with the face of the board, and mark where the ends are of the required width for the mortises.
For the mortise where the decorative board meets the centre post I use the Leigh FMT, with the 1/2" by 2-1/2" joint guide and 1/2" spiral upcut bit. Clamp a decorative board with the face side against the Leigh FMT jig as in picture 21, and cut a mortise 1-1/64" deep and a little over 2-1/2" wide starting from the bottom of the board.
The other two mortises will be a hand job, i.e. predrilling the mortise slots and using chisels to clean out the mortises. Make a bracket from a thick piece of scrap oak with a piece of MDF screwed to the side such the MDF is square with the bottom. Next run the bracket through the table saw with the bottom against the fence at a width of 8-5/8". Put a 1/2" lipped brad-point drill bit in the drill press. Clamp the decorative board against the bracket such that mortise surface is flush with the top edge of the MDF. I use four clamps because the drilling will put lots of pressure on the board. Next position the bracket with board under the drill bit and clamped the bracket to the drill press table. See picture 23. The mortises for the side posts should be 2-5/8" deep and those for the vertical supports 1-5/8" deep. After drilling clean up with chisels. Go slow, test the fit often and make sure the face of the decorative board and the face of the side post/vertical support are flush and flat.
Note -- I found it easier to temporary remove the top rail with vertical support and centre slats while fitting the decorative board to the side and centre post. Fit the vertical support tenon and mortise, and when that fits to put everything back together again.
Notice on drawing 3 that the decorative boards have sharp corners on either side of the side posts. After making sure that the amount of material on each side of the side post is the same, those sharp corners need to be rounded with the drum sander to a radius of about 1/2". I use a toonie (Canadian two dollar coin) to mark the rounding for those corners. Sand the edges of the decorative boards using a sanding block with 220 grid sandpaper until absolute smooth. That is the first place that people will touch who come to admire your project. Use your finger tips to feel for any imperfections. Do not sand the spots where the posts meet the decorative boards. Sand the back of the boards. Do not chamfer the back yet as it is easier to trace the shape of decorative boards onto the remaining slats.
Remaining Slats and Glueing
Now that the decorative boards are done we can glue the top rails with vertical supports and centre slats to the centre posts, again slide the side posts over the other end, and clamp everything.
Next cut two 23-3/16" long slats for the lowest side slats of the headboard, and cut a 5/16" by 3/4" tenon on centre with a length of 3/4" on both ends of these slats. Put a 3/32" chamfer on the back edges of the slats and sand all sides, except the face, with 220 grid sandpaper. Glue the slats against the vertical supports of the headboard, and again slide the side posts over the ends for structure and clamp everything.
Now we are ready to glue the side posts to the headboard and footboard. Use plenty of clamps. After the glue is dry, do a final dry fitting of the decorative boards over the posts. This is the time to make final adjustments.
The next centre slats -- third from the bottom on the footboard, and forth from the bottom on the headboard -- rest actually on the shoulder of the vertical support. Cut them about 16" long. Cut a 5/16" by 3/4" tenon on centre with a length of 3/4" on one end. Place the shoulder against the centre post, mark the other end where the tenon of the vertical support begins, and cut off the excess. With the decorative board in place, put the slat shoulder again against the centre post and trace the shape of the decorative board onto the side of the slat. Mark the centre of the slat where a 5/16" thick tenon will come. Take away the excess material but stay shy of the traced outline from the decorative board. When the tenon is of the proper thickness, mark the matching mortise slot on the decorative board and cut the mortise. Note that the face of the slat must be flush with the face of the decorative board. Once the tenon fits in the mortise, gradually chip away at the sides of the slat so that it has a perfect fit with the curve of the decorative board. See also pictures 25 and 26. Glue the slats against the centre post while sliding the decorative boards in place for structure. In order to slide the tenon into the centre post from the face side, it might be necessary to sand off a bit from the back side of the end of the tenon. Don't sand off anything from the base of the tenon, i.e. the part closest to the shoulder.
On the remaining 12 slats cut a 5/16" by 3/4" tenon on centre with a length of 3/4" on one end. With the decorative board in place, put the slat shoulder against the centre post or vertical support as appropriate and trace the shape of the decorative board onto the side of the slat. Trim a wee bit longer than the desire length. Remove excess material using a chisel and/or draw knife. Note that there will be no tenon on the shaped end of the slat. Finally use the drum sander to gradually remove the last material. Check the fit frequently. In order to slide the tenon into the centre post or vertical support from below, it might be necessary to sand off a bit from the top side of the end of the tenon. Don't sand off anything from the base of the tenon, i.e. the part closest to the shoulder. Sand all sides of the slats, except the front side.
Route a 3/32" chamfer of the back edges of the slats. Route a 3/32" chamfer on the back of the decorative boards, again avoiding the area where the posts meet the boards.
Glue the decorative boards in place. Glue the 12 slats in place, making sure that they are flush with the face of the decorative boards. When the glue is dry, sand the whole face of the headboard and footboard flush with an random orbit sander, and put a 3/32" chamfer of all face edges. Optionally pre-drill a tiny hole from below (at an angle) through the shaped end of each slat into the decorative boards and carefully hammer in a small finishing nail.
Fill up any imperfections or gaps using a good red oak wood filler and sand flush when dry. The Woodwise wood filler I am using is applied to the bare wood, and stains and varnishes perfectly.
Cleats
Use drawing 8. For the cleats I use poplar. Nobody sees the cleats and it is much cheaper. Rip the cleats and centre support to the rough dimensions. Joint one side to make it straight. Next joint an adjacent side of the cleats to make that straight and perpendicular to the first one. Then run the remaining two sides through the planer to get 1-1/2" square cleats. Run the opposite side of the centre support through the planer to a thickness of 1-1/2". Joint one side straight, rip the other side through the table saw and make a few passes over the jointer to get a width of 3". Trim the cleats to length, creating a 45° angle on each end. Mark the centre on the bottom of the side cleats, match that to the centre biscuit marking at the bottom of the side boards, and transfer the other marks for the biscuit centres to the cleats.
Mark the centre of the headboard and footboard cleats. Cut a dado slot in the back of the cleats to fit over the centre posts. It should be 2" wide and about 3/8" deep. Mark the recess on the top/front of the cleats to receive the centre support, and chisel out that slot. 3" wide and 3/4" deep. Put the headboard and footboard cleats in place and transfer the biscuit centre marks onto the bottom of the cleats.
The biscuit saw should still have the same setting as used for cutting the biscuit slots in the bottom rails. Now cut the biscuit slots in the cleats, using the bottom of the cleats as the reference surface. Next glue the cleats to the side boards and head/footboards, gluing the biscuits and also the back surface of the cleats. Use plenty of clamps.
After the glue is dry, dry-fit the whole bed together. I use a few straps (see picture). Measure the required length of the centre support; it should be very close to 78-3/4". Cut an 3/4" half lap joint on each end of the centre support. Fit the centre support to the head/footboard cleats. The centre support should be flush with the top of the cleats, and fit in easily. Remember that the cleats and centre support will receive two to three coats of varnish!
Finally cut a 3/4" deep 1-1/2" square mortise in the centre on the bottom of the centre support. The tenon of the centre support post should fit in there. Glue the centre support post to the centre support.
Bolt Covers
For the bolt covers I use some leftover pieces of red oak. Smooth to a thickness of 5/8", 1-5/8" wide, and make four pieces of 4-7/8" long. Cut the corners at 45°, about 3/8" from the corner. Using a 45° chamfer bit route a 3/16" edge on all the edges of one face. On the backside use a Forstner bit to drill a 5/8" counterbored hole to a depth that the steel cup is flush with the backside of the bolt cover (1/4"). Screw the steel cups in the holes on the back side; pre-drill!. Put the rare earth magnets in the steel cups. Again on the backside, drill pilot holes 1/2" from the top and bottom on centre, and hammer in two small nails. Make sure that the nails do not go all the way through!!! Pinch off the excess leaving about 1/8" protruding. At the bottom of the backside take a bit of material away, just enough so that you can get a fingernail or screw driver behind it to remove the bolt covers from the side posts.
On the backside of the side posts of the headboard and foot board mark two positions for pilot holes; one at 7-9/16" and one at 11-7/16" from the bottom of the side posts. Drill a pilot hole a wee bit wider than the nails used in the bolt covers. With the bolts in place, the nails and the rare earth magnets in the bolt covers should keep them in place on the side posts over the bolt holes. To remove the bolt covers use a finger nail or screw driver from the bottom.
Staining, Varnishing
I applied a wipe-on stain, and let it dry for several hours, and then wipe all surfaces with a clean cotton rag. Let it dry 48 hours, and give all surfaces a final wiping. Apply at least three coats of varnish. Let each coat dry for at least 24 hours, and do very light sanding between each coat. Don't forget to get the sanding dust off!!!
We created a contrast by painting the wall behind the bed in a shade of green, which brings out the medium brown colour of the headboard beautifully.
In case you like to know
This is how heavy the bed is:
Headboard
41 kg (90 lbs)
Footboard
32½ kg (71½ lbs)
Side boards, centre support
26½ kg (58½ lbs)
TOTAL WEIGHT
100 kg (220 lbs)
What went wrong
There is always something that goes wrong during a project. Sometimes you can find a quick fix and sometimes you throw the piece away and start all over again. Here are some of the mishaps during this project:
I used a carpenters pencil to do all my marking on the wood, but I used a ballpoint pen to take notes for this web site. While laying out the centre posts on the boards I accidentally traced the template using the ballpoint pen. The line on the back of the post is difficult to erase as it is not a saw line. Arrggghhhh.
After jointing one face of each of the side rails I realized that I would not be able to maintain the desired thickness of 1-1/4" after planing the other sides. I ended up with a thickness of 1-3/16", and decided that nobody would notice a 1/16" difference compared to the 1-1/4" thickness of the rails of the headboard and footboard. Lesson learned is that the longest required boards should be taken from the straightest rough sawn lumber. Arrggghhhh.
After I adjusted the Leigh FMT, using the joint alignment sight, and set it for mortises that are 1" on centre from the face of the bottom bed posts I got a nasty surprise after I routed the first mortise. The mortise was not 1" on centre from the face of the post. I was puzzled for a while, but when I checked the joint alignment sight against the two marks on either side of the cutter opening using a straight edge it was clear that the sight was off by about 1/16". Although the sight and its rails looked clean, after I disassembled them there was obvious wood dust build-up that caused the problem. After cleaning and assembling everything was fine again. Fixed the mortise by gluing a scrap piece of wood on the side that was to far out, and after the glue was dry I re-routed the correct mortise again. Lesson learned is to check the joint alignment sight regularly against the markers on the cutter opening with a straight edge. Arrggghhhh.
The intention was to also make a tenon on the shaped end of the 12 remaining slats. I realize during the construction that that would be quite difficult, and I went to plan B, that is to use biscuits to attach the shaped end of the slats to the decorative boards. Also that seemed very difficult to do if not impossible, and hence plan C, that is to glue the shaped ends to the decorative boards and securing those with an optional finishing nail. Not my favourite solution, but the only one that can be made invisible. Arrggghhhh.
My plan was to carve 1-5/8" round rosettes as bolt covers. After I carved one rosette and tried it to see what it looked like, I came to the conclusion that the rosette was nice, but had no place on this style king-size bed. That is why I made simpler bolt covers that match the design better. Arrggghhhh.
While inspecting the second coat of varnish, I accidentally pushed over the footboard. The top arch landed on some scrap red cedar under my workbench, basically breaking the fall. Luckily the damage was minimal, and I could fix it with a little sanding, stain and varnish. Arrggghhhh.


